Sweet Coconut Rice Cake Delights
Craving a sweet treat? My grandmother's Steam Sweet Rice Cake Delight in 50 Min is a chewy, coconut-filled wonder that's quick to whip up and perfect for celebrations!

Welcome to the World of Sweet Coconut Rice Cake Delights
Have you ever taken a bite of something so delightful, it instantly transports you to another world? i remember the first time i tried a sweet coconut rice cake—the soft, chewy texture mixed with that rich coconut flavor, all tied up with a sweet touch from palm sugar.
Oh my gosh, it was a game changer! if you're looking to whip up something special, look no further than steam sweet rice cake delight in 50 min .
Trust me, this recipe is gonna be your new favorite!
A Glimpse into the Roots
Now, let’s chat a bit about this fantastic dessert. this traditional asian dessert recipe has roots that stretch all the way across asia, from thailand to the philippines.
It’s a dessert that people make for celebrations and just about any festive occasion. the combination of glutinous rice flour , coconut milk , and palm sugar creates a chewy treat known to capture hearts—and taste buds! modern-day folks can find it popping up at various asian bakeries and even trendy dessert spots across the u.
S.
This recipe isn’t just easy; it’s a total win-win ! you can have your kitchen ready for action in about 15 minutes , and then it’s just 30 minutes of steaming for that perfect chewy delight.
The final yield? a dozen small rice cake delights—perfect for sharing… or not! who am i kidding? you’ll probably want them all to yourself!
Why You Need to Try This Recipe
Now, let’s dive into the health benefits of these sweet treats. not only are they delicious, but they also come with the bonus of being gluten-free! perfect as a nutritious dessert snack , these aren’t your average sugary sweets.
Plus, they serve as an excellent option for those seeking dietary-friendly desserts . the rich coconut milk adds healthy fats, while the chewy texture hits just the right spot in your sweet tooth.
What i absolutely love about these rice cakes is their versatility. you can whip them up for a family gathering, a cozy get-together with friends, or just as a reward for yourself after a long week! and let's not forget about those creative rice cake variations.
Want to jazz things up? throw in some fresh fruit toppings, maybe some mango or strawberries. pair it with a cup of warm jasmine tea, and you’ve got a treat that’s perfect for any occasion.
Compared to other desserts, this one stands out with its unique flavor profile and texture. i mean, have you tried other steamed dessert ideas ? they might be great, but nothing quite compares to that lovely chewiness of a properly made sweet coconut rice cake.
Ready to Get Cooking?
Alright, if all this chat about these delightful little treats has got you salivating, let’s dive right into how to make your own sweet coconut rice cake delights.
Don’t let the thought of steaming intimidate you; it’s super simple, almost therapeutic, if you ask me. just think of it as waiting for all that deliciousness to happen right in front of you!
So grab your glutinous rice flour , coconut milk , and some palm sugar . Make sure your steamer is ready, and let’s create a dessert that will have your loved ones wanting seconds… or even thirds!
Get excited, because you’re about to embark on a sweet adventure that’ll leave your kitchen smelling divine! hang tight; next up, we’ll talk about the ingredients that will take your dessert to the next level.
Essential Ingredients Guide
When it comes to whipping up a delicious sweet coconut rice cake delight , knowing your ingredients makes all the difference.
Let’s break down what you need, both in terms of quality and storage, to make sure everything’s on point.
Premium Core Components
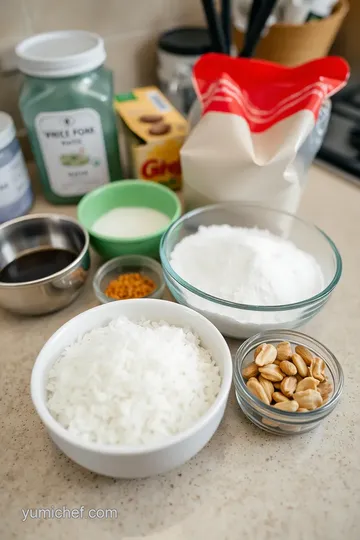
First things first— measurements ! for this recipe, you'll need 2 cups (240g) of glutinous rice flour and 1 cup (240ml) of coconut milk .
If you're using palm sugar, grab ½ cup (100g). honestly, it’s better to weigh your ingredients when you can. it makes baking and cooking so much easier, and the results are way more consistent.
Now, keep an eye out for the quality indicators . when choosing rice flour, make sure it's fresh. nobody wants a stale flavor going into their sweet treats.
Fresh coconut milk is your best bet, either from a can or straight from a coconut if you're feeling ambitious.
As for palm sugar, go for the coarsely grated kind; it dissolves beautifully in your batter.
As for storage guidelines : keep your rice flour in an airtight container, and it should last a few months.
Coconut milk? if you don’t use the whole can, transfer it to a container and refrigerate. just make sure you use it within a week.
When it comes to palm sugar, store it in a cool and dry place.
Signature Seasoning Blend
Next up, we gotta chat about signature seasonings . for the sweetness in our rice cake, we'll use that palm sugar, which has a lovely caramel note.
Feel free to play with flavors here! think about adding a teaspoon of vanilla extract for a subtle touch. it can really harmonize with the coconut milk recipe you’re brewing up.
If you’re feeling adventurous, toss in a pinch of salt—trust me, it enhances all those tasty flavors.
When it comes to herb pairings , there really isn’t much to throw in, but don’t shy away from garnishes like a sprinkle of toasted coconut or fresh fruit on top.
That’s what brings the whole asian dessert recipes vibe together.
Smart Substitutions
Now, life happens, right? you’re in the kitchen, and maybe you’ve run out of something. what then? no sweat! for glutinous rice flour , if you’re in a bind, tapioca flour can work, but remember the texture might change a bit.
If you’re looking for palm sugar alternatives , brown sugar will fit the bill, just keep an eye on the sweetness level.
And let’s not forget about seasonal options . If you can get your hands on some pears or strawberries, they can make a delightful addition!
Kitchen Equipment Essentials
Alright, let’s talk equipment! you’re gonna want a steamer or a pot with a steaming rack—this makes all the difference in achieving the perfect steamed dessert ideas .
An 8-inch round cake pan is great for this recipe, but if you have little molds for personal servings, even better!
As for other tools, a mixing bowl and a rubber spatula are non-negotiables. don’t forget your measuring cups and spoons; precision is key, folks.
And one last thing: consider how you're going to store your goodies—an airtight container is a lifesaver for keeping those chewy rice cakes fresh and delicious.
Now that we’ve covered the essentials, you’re well on your way to creating something amazing. Just wait until you taste your Steam Sweet Rice Cake Delight in 50 Min ! Well, I don’t want to spill all the beans just yet; let’s dive into how you can bring it all together!
The Art of Professional Cooking: Your Guide to Delicious Steamed Sweet Rice Cake Delights
Welcome to the world of professional cooking ! Trust me, once you’ve got these essential preparation steps down, you'll feel like a pro in no time. Let’s dive in!
Essential Preparation Steps
Mise en Place: It’s all in the Prep!
First things first! mise en place , french for “everything in its place,” is key. gather all your ingredients before diving in.
For our sweet coconut rice cake delights , that means lining up your 2 cups of glutinous rice flour , 1 cup of coconut milk , and a pinch of salt .
This way, you aren’t scrambling for the palm sugar while your pot boils over. pro tip: measure everything in advance ! it cuts down on panic time.
Time Management Tips
Next, let’s talk timing. you want to prep in about 15 minutes , then let your rice cake steam for 30 minutes .
While it cooks, use that downtime to clean up or get your cozy dessert corner ready. seriously, a tidy kitchen makes cooking ten times more enjoyable.
Organization Strategies
Keep your workspace organized. you wouldn’t believe how easy it is to misplace a spatula. trust me; i’ve been there! keep everything within arm's reach.
It helps you stay focused, and we all know distraction leads to burnt rice cakes. just no, thank you!
Safety Considerations
Finally, safety first, my friends! whenever you're working with steam, be careful opening that lid. always lift it away from your face to avoid a nasty steam burn.
We want sweet rice cake success, not steam-induced injuries.
Step-by-Step Process
Let’s get into the nitty-gritty with our step-by-step process . It’s easier than you think!
-
Prepare the Steamer : Fill your steamer pot with water and bring it to a simmer. This step is crucial for that fluffy texture we all crave in a steamed rice cake!
-
Mix Dry Ingredients : In a mixing bowl, whisk together the glutinous rice flour, palm sugar , and salt . Keep mixing until it’s well combined; we want a smooth alignment.
-
Add Wet Ingredients : Stir in coconut milk until you reach a smooth batter. You can toss in 1 teaspoon of vanilla extract for an extra kick if you’re feeling fancy!
-
Prepare Cake Pan : Then, grease your cake pan. We're talking about an 8-inch round cake pan or smaller molds. You want these babies to slide out easily!
-
Pour and Level : Pour that lovely batter into your pan, smoothing out the top so it’s even.
-
Steam the Cake : Place your pan in the steamer and cover. Steam for 30 minutes or until you can insert a toothpick and it comes out clean.
-
Cool and Slice : Remove it from the steamer and let it cool for 10 minutes . This lets it set perfectly before slicing.
-
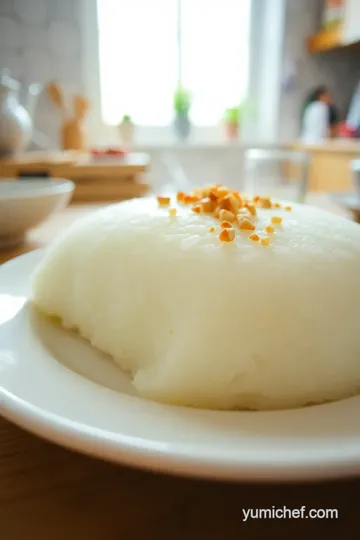
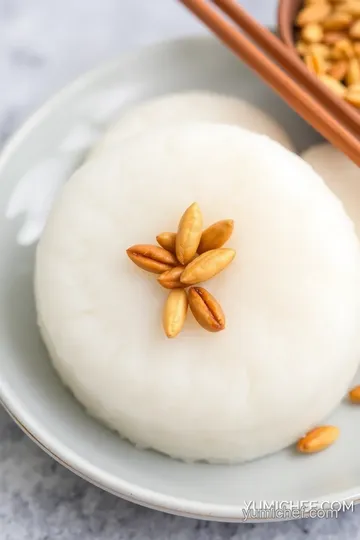
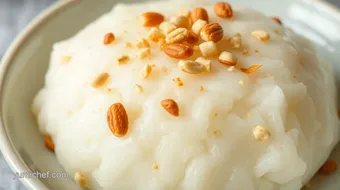
Serve and Garnish : Finally, serve your rice cake warm or at room temp, topped with some toasted shredded coconut or fresh fruit like mango.
Expert Techniques
Ever heard of troubleshooting ? let’s keep it real. if your cake doesn’t seem to rise or has a weird texture, check your steaming technique.
Avoid peeking too often! that steam escape is critical.
For quality checkpoints : before the 30-minute mark, poke that toothpick in and see where you stand. The cake should feel firm but not tough like a hockey puck!
Success Strategies
We all make mistakes when cooking. That’s part of the journey! But here are some common pitfalls to avoid with our Steamed Sweet Rice Cake Delight in 50 Min :
- Don’t rush the steaming process. Patience is key!
- Always taste the batter first. Adjust the sweetness to your liking.
- Make it a family affair! Get the kids involved; they love measuring and mixing.
Serve it Up Right!
So, whether you’re crafting these delightful chewy rice cakes for a gathering or just for fun, pair them with some tea or serve them up with fresh fruit slices.
These coconut-rich treats are not just desserts; they’re a celebration.
If you ever thought you couldn’t whip up traditional Asian sweets , think again! You just made a scrumptious dessert that’s healthy, gluten-free, and positively delightful.
Looking for more inspiration? don’t go anywhere; we got more asian-inspired sweets recipes just waiting for you! stay tuned for some fascinating tips and techniques to elevate your kitchen game.
Happy cooking, and may your journey be delicious!
Extra Recipe Insights: Steam Sweet Rice Cake Delight in 50 Min
So, you’ve decided to try making sweet coconut rice cake delights . you’re in for a treat! this classic asian dessert recipe is not just about taste; it’s a whole experience.
Let’s dive into the nitty-gritty with some cool tips, tricks, and things you might not have thought about while creating your glutinous rice flour dessert masterpiece.
Pro Tips & Secrets
First up, let’s spill the beans on some chef’s personal insights . seriously, mixing the ingredients with care makes a difference.
Use fresh, full-fat coconut milk for that rich flavor. it amps up the creaminess and, oh boy, does it elevate those chewy rice cakes.
Time-saving techniques? if you’re in a rush, mix the batter the night before and pop it in the fridge. just remember to give it a good stir before using.
You’ll skip some prep time that's valuable when you're racing against the clock.
Now for flavor enhancement tips ! add a splash of vanilla for that warm, comforting note – trust me, it makes a difference.
And for a twist, consider using palm sugar alternatives like brown sugar. it’s all about adjusting to your palate.
Finally, when it comes to presentation, keep it simple. a sprinkle of toasted coconut or some fresh tropical fruit like mango or strawberries can do wonders.
A little garnish can turn your cake from "eh" to "wow!"
Perfect Presentation
Speaking of wow-factor, let’s talk plating techniques . Serve your rice cake delights on a rustic wooden board. It gives off that cozy vibe, don’t you think?
For a neat look, use a round cookie cutter to shape the slice before plating. and don’t forget about color combinations! pair the creamy, white rice cake with bright, fresh fruit slices.
It’s like a color explosion on your plate!
Visual appeal tips? contrast is key! drape the sliced cake with a drizzle of coconut cream, then top it off with colorful berries or edible flowers.
Boom! you’ve got a feast for the eyes as well as the stomach.
Storage & Make-Ahead
Now, let’s chat storage. these rice cakes are best eaten fresh, but if you have leftovers, here’s how to store them.
Keep them in an airtight container in the fridge. they should last about 3-4 days .
If you want to get ahead, make them in advance and steam them closer to serving time. Just remember to cool them down before slicing.
Ready to reheat? A quick steam will do the trick. Just don’t throw them in the microwave, or you’ll lose that lovely chewy texture.
Creative Variations
Feeling adventurous? let’s explore some creative rice cake variations ! how about adding matcha for a lovely green hue and flavor? or if you’re a fan of that gorgeous purple hue of ube, fold in some ube puree.
It adds a delightful color and an unique taste that’s too good to resist.
Dairy-free? No problem! You can use almond milk or oat milk instead of coconut. And if you want that sweetness without the guilt, try using honey or agave syrup.
Complete Nutrition Guide
These delicious treats also have their health perks, so let's break down the nutrition. a serving has about 120 calories , making it a great option for those looking for healthy sweet treats .
They’re gluten-free, too!
When serving, keep portions in mind. One or two small rice cakes are perfect, especially paired with a cup of fragrant tea. It’s all about balance, right?
Expert FAQ Solutions
Are you wondering about topping ideas? common questions often revolve around how to get that perfect texture or what to do if your cakes don’t firm up.
If your makeshift cake turns out too soft, just steam it longer and trust that toothpick test!
Also, get creative! There are no hard rules. Adjust sweetness or add flavor infusions based on what you love or have on hand.
Conclusion
There you go! armed with these insights, you’re ready to whip up your own steam sweet rice cake delight in 50 min .
Whether you're crafting this for a festive occasion or just to satisfy those dessert cravings, you’ll have a delicious treat that everyone will love.
So go on, grab those ingredients and get cooking! happy baking, my friend!
Sweet Coconut Rice Cake Delights Card
⚖️ Ingredients:
- 2 cups glutinous rice flour
- 1 cup coconut milk, full-fat
- ½ cup palm sugar, finely grated
- ¼ teaspoon salt
- 1 teaspoon vanilla extract (optional)
- 2 tablespoons shredded coconut, toasted (optional, for garnish)
- Fresh fruit (mango or strawberry slices, optional)
🥄 Instructions:
- Step 1: Prepare the Steamer: Fill the steamer pot with water and bring it to a simmer.
- Step 2: Mix Dry Ingredients: In a mixing bowl, combine glutinous rice flour, palm sugar, and salt.
- Step 3: Add Wet Ingredients: Stir in coconut milk and vanilla extract until smooth and well combined.
- Step 4: Prepare Cake Pan: Lightly grease the 8-inch round cake pan (or molds) with oil to prevent sticking.
- Step 5: Pour and Level: Pour the batter into the prepared pan, smoothing out the top with a spatula.
- Step 6: Steam the Cake: Place the pan in the steamer and cover. Steam for 30 minutes or until the cake is firm and a toothpick inserted comes out clean.
- Step 7: Cool and Slice: Remove the pan from the steamer, allow it to cool for 10 minutes, then slice into desired portions.
- Step 8: Serve and Garnish: Serve warm or at room temperature, garnished with toasted coconut and fresh fruit slices if desired.
Previous Recipe: How to Make Fried Scallion Pancakes Crispy Delight: An Easy, Amazing Recipe!
Next Recipe: My Grandmother's Easy Bake Sour Cream Vanilla Cake in 50 Minutes