Crispy Roasted Chickpeas: The Ultimate Crunchy Snack
Looking for a crunchy snack? Try my easy roast chickpeas recipe! These flavorful bites are perfect on their own or tossed in salads. You’ll love them!

- Essential Ingredients Guide
- Professional Cooking Method: Elevating Your Snack Game with Roast Chickpeas for a Crunchy Snack
- Pro Tips & Secrets for Crunchy Roasted Chickpeas
- Perfect Presentation for Your Chickpea Snacks
- Storage & Make-Ahead Tips
- Creative Variations for Savory Chickpeas
- Complete Nutrition Guide for Healthy Snacking
- Expert FAQ Solutions
- Recipe Card
Have you ever been mindlessly snacking while binge-watching your favorite show, only to realize you’ve polished off a family-sized bag of chips? oh, how i used to fall into that trap! one day, i decided it was time to make a change.
Enter roast chickpeas for a crunchy snack —my game-changer! these crispy little gems have transformed my snacking habits, and i can’t wait to share them with you!
These crunchy chickpeas are a delightful twist on traditional snacks. packed with flavor and crunch, they are the quintessential healthy snack .
Trust me; it's a snack you can feel good about—no guilt here!
Recipe Overview
Roasted chickpeas hail from mediterranean cuisine, where they’ve been enjoyed for centuries. historically, chickpeas have been a staple for nourishment, versatile enough to show up in salads, soups, and even desserts.
Fast forward to today, and these little guys are having a moment in the limelight!
People are all about those vegan snacks and high-protein snacks these days, and crunchy roasted chickpeas fit the bill perfectly.
They’re trendy, they’re satisfying, and they make for a fantastic alternative to chips. plus, the best part? you can whip them up in just about 70 minutes —including prep and cooking time.
It’s seriously that fast. and guess what? they’re so easy that even my cooking-challenged friend could handle it!
Now, let’s talk about cost. first off, canned chickpeas are cheap—like, “i can make a gourmet meal for less than $5” cheap.
With just a couple of cans, a splash of olive oil, and a few spices, you can make snacks that yield enough to share (or not).
In my world, hiding snacks is a perfectly normal activity.
Key Benefits
So why should you ditch those potato chips for crunchy roasted chickpeas? for starters, they’re incredibly nutritious. chickpea nutrition is off the charts—packed with protein, fiber, and all that plant magic your body craves.
They’ve actually become one of my go-to options when i’m trying to cut down on carbs. hello, chickpeas for weight loss !
But wait, there’s more. these seasoned chickpeas are fabulous for serving at gatherings. imagine walking into a party armed with a bowl of spicy roasted chickpeas while your friends munch on boring old snacks.
Talk about being the ultimate snack hero! they add sophistication to any spread and can be easily customized with different herb and spice combinations to impress even the pickiest of eaters.
Plus, if you or someone you care about is on a gluten-free journey, these are fantastic gluten-free snacks that everyone can enjoy without worry.
And if you’re trying to be health-conscious while satisfying that craving for a crispy snack , this is truly a match made in snack heaven! and let’s be real, who wouldn’t want to munch on some savory chickpeas that pack both flavor and a crunch?
So, are you tempted yet? It’s time to dive into the ingredients to make these crunchy little delights!
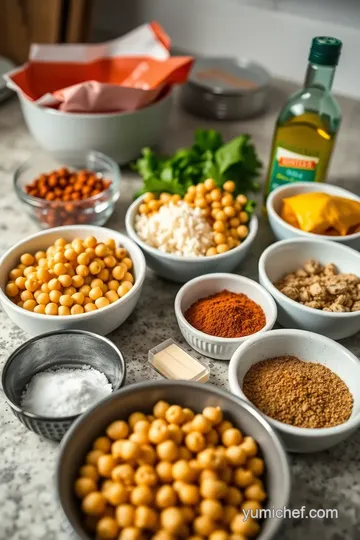
Essential Ingredients Guide
Let’s dive into the essentials that’ll make your kitchen sizzle! cooking is an art, but having the right ingredients can turn any meal from drab to fab.
So, when it comes to crunchy snacks like roasted chickpeas, it all starts here.
Premium Core Components
When you’re shopping or just digging through the pantry, you want to know what you’re working with, right? Measurements are key. Here’s a quick run-down for ya:
- Chickpeas: Grab two cans of 15 oz each, or about 3 cups of cooked chickpeas. Trust me; these little legumes are the backbone of killer snacks.
- Olive oil: You'll need 2 tablespoons (30 ml) to amp up that flavor.
- Salt: Just 1 teaspoon (5 g) will do.
Now, if you wanna pick the best quality, opt for chickpeas in bpa-free cans . check the expiration dates, and remember, the fresher, the better! store your dried chickpeas in a cool, dark spot.
They can last for ages, but once cooked, use them within a week if stored in the fridge.
Signature Seasoning Blend
Here comes the fun part: spices ! The beauty of these crispy roasted chickpeas lies in their seasoning. Here’s where you can play around and make them sing:
- Essential spices: Think smoked paprika (1 tsp) and cumin (1/2 tsp) . They bring that Mediterranean flair.
- Herbs: Fresh or dried, oregano or thyme will give your chickpea crunch a nice depth.
- Spicy kick: If you’re feeling bold, toss in cayenne pepper (1/2 tsp) for some heat. It’s what makes those spicy roasted chickpeas addictive!
Smart Substitutions
Let’s be honest, we don’t always have everything on hand. Here’s a lifeline for when you need to improvise:
- Chickpeas: If you only have dried ones, no problem! Just soak and cook ‘em until tender.
- Oil: Out of olive oil? No biggie—use avocado oil instead.
- Herbs & spices: Don’t stress if you’re missing something. Get creative! Throw in whatever you have around, like Italian seasoning or even a sprinkle of cinnamon for a sweet twist.
These chickpea snacks are so versatile, you could mix it up every time!
Kitchen Equipment Essentials
Now, let’s talk tools. Don’t worry; you don’t need a commercial kitchen to whip up this recipe. You just need a few basic items:
- Baking sheet: A good one will last you for years.
- Mixing bowl: Something big enough to toss all those flavors together.
- Parchment paper: Optional, but makes for an easy cleanup—thank me later!
- Measuring spoons: For those precise measurements we discussed.
If you don’t have a baking sheet, use a cast-iron skillet! It adds specialty to your crispy snacks.
Freshness Tips
When aiming for excellent chickpea nutrition , try to use the freshest ingredients. This not only enhances the flavor but gives you all the health benefits that come with them. Always remember:
- The drier the chickpeas, the crunchier the final product! Pat them dry before seasoning.
- If you're prepping ahead, season before cooking and let them sit for 30 minutes . It infuses those flavors!
So, whether you’re diving into a delicious batch of oven-roasted chickpeas as a snack or sprinkling those bad boys over a salad, you'll find that the right ingredients and equipment can elevate your meals to rockstar status.
Stay tuned! Next, we’ll jump into the step-by-step instructions to Roast Chickpeas for a Crunchy Snack that you won’t want to miss. Let's get crispy!
Professional Cooking Method: Elevating Your Snack Game with Roast Chickpeas for a Crunchy Snack
Let’s get real for a minute. we all want easy yet delicious snacks that make us feel good, right? if you haven’t tried roasting chickpeas , you’re seriously missing out! they are not just a popular option in mediterranean snacks , but they also fit into the healthy lifestyle scene.
Whether you're looking for gluten-free snacks or something quick, crunchy chickpeas will become your new favorite.
Essential Preparation Steps
First up, let’s talk about the mise en place . it’s fancy french lingo, but simply means getting everything ready before you start.
Drain your chickpeas (2 cans is all you need), rinse ‘em, and dry them well. the drier the chickpeas, the better your oven-roasted chickpeas will be.
Just pat them down with a towel (no point in rushing!).
Next, time management! you want to maximize flavor while keeping things efficient. i usually set aside about 10 minutes for the prep.
But don’t rush. letting the chickpeas rest for about 30 minutes after drying helps them absorb those spices better.
Trust me on this one!
Now for organization. keep your workspace tidy. gather your olive oil, salt, and any spices you fancy like smoked paprika or cumin .
A little organization goes a long way in avoiding a chaotic kitchen, and let's be honest, no one wants that while they crave crunchy snacks.
Safety considerations? Don’t forget to use an oven mitt! Those baking sheets get super hot, and trust me, nobody wants a burnt arm while reaching for your crunchy chickpeas.
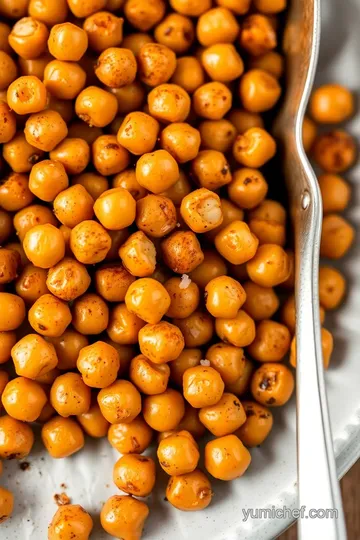
Step-by-Step Process
Okay, let’s break down the roasting.
-
Preheat your oven to 400° F ( 200° C) . This means business!
-
Prepare your chickpeas : after drying, toss them in a mixing bowl with 2 tablespoons of olive oil and 1 teaspoon of salt .
Feel free to add any additional spices that tickle your taste buds. remember, spicy roasted chickpeas can pack a punch if you fancy things hot!
-
Spread them on a baking sheet : It’s crucial to give them space. If you crowd them, you’ll end up with soggy bits instead of crunchy perfection.
-
Roast for 25- 30 minutes . Halfway through, give that pan a good shake. Keep an eye on them in those final minutes—they should be golden and super crispy!
-
Let them cool for about 5- 10 minutes . They’ll continue to firm up as they cool down. Nothing like the anticipation of devouring those crispy morsels!
Expert Techniques
Here’s where i drop some wisdom i’ve learned on my culinary adventures. always dry your chickpeas thoroughly; it’s the secret to those crispy snacks ! when trials turn into triumph, you'll feel like a kitchen rock star.
While roasting, temperature control is key. every oven can be different, so you might want to invest in a precise oven thermometer .
This little gadget ensures you're at that sweet spot of 400° f ( 200° c) the whole time.
And if by chance your chickpeas seem to burn? No worries! Just lower the heat slightly next time. No one likes scorched snacks!
Success Strategies
Now, let’s talk about those little mistakes we often overlook. common ones: not enough drying or overcrowding the pan. learn from me; give your chickpeas space and they’ll reward you with that satisfying crunch.
Before serving, taste-test a few to check for flavor. if they need more seasoning, this is the time to fix that! also, consider making a big batch ahead of time for those late-night cravings.
They last for up to a week when stored in an airtight container—perfect for grabbing a handful during a netflix binge!
Lastly, if you’re feeling adventurous, try adding a little sprinkle of lemon zest or different herbs for a fresh twist. Your chickpea appetizers will blow everyone’s mind!
Additional Information
And there you have it! your guide to roasting chickpeas for a crunchy snack that’s not just delicious but also packed full of nutrition.
Whether you’re whipping these up for movie night or tossing them into a salad, you’re gonna love how easy and rewarding they are.
So get your snacks game on point, and remember: with easy chickpea recipes , you’re never short on guilt-free treats!
Pro Tips & Secrets for Crunchy Roasted Chickpeas
Alright, friends, let’s dive into the magical world of roast chickpeas for a crunchy snack ! these crispy morsels are not only delightful but also so easy to whip up.
Got a little time? let’s jazz up your snack game with some pro tips.
Chef's personal insights:
here’s the deal: the drier your chickpeas, the better the crunch. i’ve learned this the hard way! after rinsing, pat them down with a towel.
A little love goes a long way.
Time-Saving Techniques:
Hate waiting around? Me too! Use canned chickpeas to cut down on cook time. If you're feeling ambitious, go for dried ones, but remember to soak them!
Flavor enhancement tips:
don’t be shy with the spices! try combining smoked paprika with a pinch of cayenne for some spicy roasted chickpeas ! or if you’re feeling sweet, a sprinkle of cinnamon sugar can transform these crunchy chickpeas into a gourmet treat.
Presentation advice:
come on, we eat with our eyes first! plate your crispy chickpeas in a fun bowl and toss in some fresh herbs on top.
That vibrant green against the golden chickpea crunch? chef's kiss!
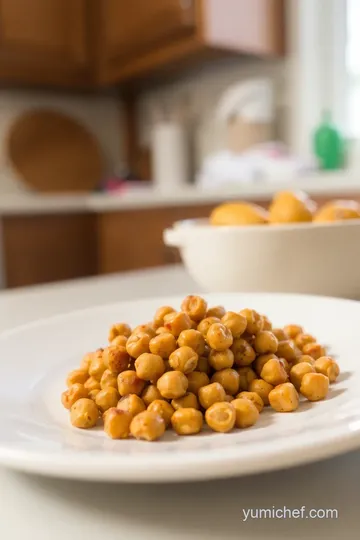
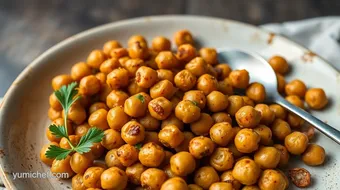
Perfect Presentation for Your Chickpea Snacks
Now that you know how to whip these up, let’s chat about how to make them look as good as they taste.
Plating Techniques:
Think about using a wide plate instead of a deep bowl. That way, your oven-roasted chickpeas get all the spotlight. Scatter them around like confetti!
Garnish Ideas:
A sprinkle of fresh parsley or chopped cilantro adds pop and freshness. And hey, some edible flowers would make your chickpea appetizers even cuter!
Color Combinations:
Mix and match! Try adding some bright veggies or fruits next to your chickpeas to jazz up the plate. Carrots or cherry tomatoes? Yes, please!
Visual Appeal Tips:
Texture is key! Pair your crispy snacks with something creamy like a yogurt dip. The contrast will be stunning!
Storage & Make-Ahead Tips
Let’s talk about keeping those (if there's any left!) crunchy chickpeas fresh.
Storage Guidelines:
Keep your seasoned chickpeas in an airtight container. I’ve made the mistake of leaving them out, and trust me, soggy chickpeas are a sad fate!
Preservation methods:
want them to last? you can freeze them, but i find that fresh is best! if there’s a lot left over, just roast a small batch at a time to keep the crunch.
Reheating Instructions:
When reheating, pop them back in a hot oven (about 350° F) for 5- 10 minutes. It’ll help the crunchy texture bounce back.
Freshness Duration:
These little guys have a shelf life of about a week. But honestly, they’re so good, they'll probably be gone in a day or two!
Creative Variations for Savory Chickpeas
Tired of the same old flavors? Spice things up with some fun variations!
Flavor Adaptations:
Instead of traditional spices, go for a Mediterranean twist with lemon zest and oregano. Trust me, your taste buds will thank you!
Dietary Modifications:
Trying to eat clean? Opt for olive oil, and you’ve got yourself a winner in the healthy snacks department. Plus, they’re naturally gluten-free!
Seasonal Twists:
As pumpkin spice season rolls around, think about adding a touch of pumpkin spice to your chickpeas for a fun fall flair.
Regional Variations:
Give it an Asian flair with soy sauce, ginger, and sesame seeds. Or go Middle Eastern with za'atar and a drizzle of tahini.
Complete Nutrition Guide for Healthy Snacking
Let’s break it down for those of you counting carbs or watching calories.
Detailed Breakdown:
One serving has about 150 calories, with a solid 6g of protein. Perfect for those on the go!
Health Benefits:
Chickpeas are packed with fiber and full of plant-based protein snacks that keep you full. Plus, they’re great for your gut health!
Dietary Considerations:
These crunchy, roasted legumes are fantastic for vegan diets and those looking for guilt-free snacks.
Portion Guidance:
Two cups should suffice for 4-6 people, but let’s be honest: you might polish off the whole batch solo. No judgment here!
Expert FAQ Solutions
Got questions? I’ve got answers!
Common Questions:
“Can I make these spicy?” Absolutely! Add more cayenne or try hot paprika!
Troubleshooting Guide:
If they aren’t crispy enough, forget the microwave! Just pop ‘em back in the oven for a few.
Success Tips:
Don’t overcrowd the baking sheet. Space is key for those crunchy snacks.
Variations Explained:
Feeling adventurous? Mix multiple spice blends for a layered flavor profile.
In the end, roast chickpeas for a crunchy snack are super versatile. they’re not just snacks; they’re little crunchy nuggets of joy.
Experiment with flavors, have fun in the kitchen, and celebrate those wins, big and small. happy snacking, friends!
Crispy Roasted Chickpeas: The Ultimate Crunchy Snack Card
⚖️ Ingredients:
- 2 cans (15 oz each) chickpeas, drained and rinsed
- 2 tablespoons olive oil
- 1 teaspoon salt
- 1 teaspoon smoked paprika
- 1 teaspoon garlic powder
- 1/2 teaspoon cumin
- 1/2 teaspoon cayenne pepper (optional)
- 1 teaspoon dried herbs (e.g., rosemary or thyme)
🥄 Instructions:
- Step 1: Preheat oven to 400°F (200°C).
- Step 2: Drain, rinse, and pat chickpeas dry with a kitchen towel.
- Step 3: In a mixing bowl, combine chickpeas with olive oil, salt, and desired spices.
- Step 4: Transfer seasoned chickpeas to a baking sheet in a single layer.
- Step 5: Place in the oven and roast for 25-30 minutes, shaking the pan halfway through.
- Step 6: Remove when golden and crispy, let cool for 5-10 minutes, then serve or store.
Previous Recipe: Easy Roast Veggies with Herb Brush Delight: 5 Delicious Ways to Enjoy!
Next Recipe: My Kitchen-Tested Way to Sear Scallops in Zesty Lemon Herb Sauce