Roast Butternut Squash Seeds for Crunchy Joy
Ever wondered how to make delicious roasted butternut squash seeds for crunchy joy? Join me on this cozy journey and enjoy a healthy snack that you can savor anytime!

Oh my gosh, let me tell you about that time i decided to clean out my pantry. i stumbled upon a butternut squash lurking in the back, just waiting for its moment to shine.
I mean, it was pretty hefty, so i figured, “why not roast it or something?” as i sliced it open, i noticed seeds glistening inside, and that’s when it hit me: roast butternut squash seeds for crunchy joy ! i had a lightbulb moment! i just had to whip up a snack with those seeds.
If you’ve ever wondered if those tough little guys can become something delicious, you’re in the right spot.
Snacking doesn’t have to be guilty. butternut squash seeds are a fiber-rich snack that’s as nutritious as it is tasty.
Plus, with the hustle and bustle of fall, these little nuggets are the perfect easy snack ideas to munch on during those football games or cozy movie nights.
Recipe Overview
Did you know that roasting seeds is a tradition that goes way back? cultures across the globe have been sipping tea and munching on roasted seeds for centuries.
Fast forward to modern times, and hey, they’re a hit! everyone is on the lookout for healthy fall snacks , and roasted butternut squash seeds really fit the bill.
So, how much time do you need? honestly, you’ll spend about 10 minutes on prep and then around 20- 25 minutes baking .
In total, it’s just under 40 minutes! plus, it’s super easy—perfect for novice chefs and seasoned pros alike. the best part? you’re probably going to end up with about 1 cup of delicious seeds , which can serve 2-4 folks just fine.
All the more reason to invite friends over and snack together!
As for cost, these seeds are practically free if you think about it—just saves you from tossing them in the compost.
You'll pay a couple of bucks for some olive oil and maybe seasoning, so it’s definitely budget-friendly.
Key Benefits
Now let’s dive into why you’re going to be head over heels for these seeds. first off, they’re not just tasty; they’re packed with nutrient-dense snacks ! butternut squash seeds come with a hefty dose of protein and healthy fats.
They’re like little energy boosters you can take on the go.
Want unique vibes at your next gathering? roasted seeds are fantastic as salad toppers ! they add that extra crunch that everyone loves.
Seriously, who doesn’t enjoy a little something crunchy when munching on leafy greens? perfect for those seasonal snacks when the weather turns cool and cozy.
And let’s talk variations! you can spice them up with flavors like garlic powder or smoked paprika. the world of spiced seed recipes is at your fingertips; it’s all about fun customization.
Plus, if you have kids, they’ll be begging for more once they catch a whiff of these crunchy delights!
Honestly, if you’re trying to eat cleaner or just want some whole food snacks , roasting these seeds is a super fun diy project.
It’s like, why not turn your fall squash into something that’s both tasty and makes your kitchen smell divine?
Transition to Ingredients
Ready to get your hands on these little gems? let’s hop right into what you need to create the magic of roast butternut squash seeds for crunchy joy at home.
Grab your butternut squash and some basic pantry staples, and let’s turn those seeds into a delicious reality. it’s snacking made simple!
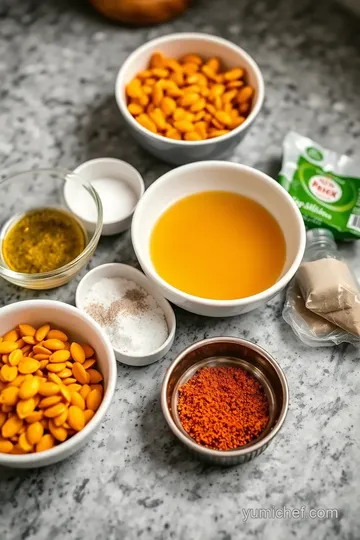
Your Ultimate Guide to Essential Ingredients
Hey there, friends! let’s talk about something we all need in our kitchens: essential ingredients . whether you're a seasoned chef or a newbie whipping up your first meal, understanding your pantry staples can make a world of difference.
So, grab a drink and let’s chat about premium core components , splendid seasoning blends, smart substitutions, and the kitchen gear you absolutely can't do without.
Premium Core Components
When grabbing ingredients, keep your eyes peeled for quality indicators . fresh and vibrant colors scream “pick me!”, while dull, wilty produce? nah, leave that behind at the store.
You’ll want to store these goodies right, too! generally, most herbs and spices last a whole lot longer if kept in a cool, dark place.
For maximum freshness, try to use them within a year . and speaking of freshness, don't forget to check the expiration dates when you shop!
Here’s a nifty tip: when picking out a butternut squash , look for a firm texture. that’s a keeper! but if it’s squishy? pass! that’s not gonna work for your homemade roasted seeds later on.
Trust me on this one!
Signature Seasoning Blend
Let’s chat about spice combinations ! a good starting point is the classic salt, pepper, and garlic powder trio. from there, the world is your oyster (well, this article is about cooking, not sea creatures).
You can’t go wrong with smoked paprika—it gives your dishes that smoky flavor that just screams cozy autumn evenings.
Experiment with fresh herbs like basil and thyme. they really punch up the flavor and scent. and, hey, next time you're stocking up, try exploring the spice aisle for local or regional seasonings.
Sometimes all you need is a twist, like adding a bit of old bay or some chili powder to make your dishes pop!
Smart Substitutions
Okay, real talk. sometimes you run out of an ingredient at the worst possible moment. no worries! you can use common alternatives.
Maybe you're out of olive oil? try using avocado oil instead! it's got a higher smoke point and a lovely flavor.
Vegan? no problem—coconut oil is your friend.
Now, if you’re knee-deep in a recipe calling for butternut squash but all you've got is zucchini, sub that bad boy in! sure, it’ll taste different, but it'll add some comforting deliciousness nonetheless.
And speaking of butternut squash, have you tried to roast butternut squash seeds for crunchy joy ? you get these nutty snacks with so much crunch, they're perfect for munching on while you tackle dinner.
Kitchen Equipment Essentials
Now, let's get down to the nitty-gritty of kitchen tools . you don’t need a ton of fancy gadgets, just the essentials.
A good knife, a sturdy cutting board, and a trusty baking sheet can get you pretty far. but if you have a mandoline to slice the veggies like a pro? well, the universe is your oyster!
Don't forget about storage solutions. those leftover roasted butternut squash seeds? pop 'em in an airtight container, and they’ll be ready for snacking all week long.
Plus, if you're into meal prepping, make sure you have some good glass containers. they keep food fresh without those pesky plastic chemicals leaching into your food.
Wrap Up Before We Cook
So there you have it, a cozy little rundown of essential ingredients, stellar seasoning options, and foolproof kitchen tools. remember, cooking should be fun, and with these tips, you'll be whipping up nutritious, nutty flavored seeds for snacks in no time at all.
Get excited about adding your homemade roasted seeds to salads or just munching on them as they are.
Ready for the step-by-step on how to bring your Roast Butternut Squash Seeds for Crunchy Joy to life? Stick around—let’s dive into those instructions next!
look into into Professional Cooking: Mastering the Art of Roasting Butternut Squash Seeds!
Cooking is like a dance, isn’t it? you’ve got to set the stage before the curtain goes up! whether you’re whipping up an autumn snack or prepping a feast, starting with the right foot is crucial.
So, let’s get our hands dirty and dive into the professional cooking method to create scrumptious roast butternut squash seeds for crunchy joy !
Essential Preparation Steps
Mise en place is your new bestie. it’s a fancy term that means “everything in its place.” before you toss that butternut squash in the oven, gather your ingredients.
You’ll need 1 cup of cleaned and dried butternut squash seeds , 1 tablespoon of olive oil , and some salt for seasoning.
Easy-peasy, right?
Now, time management is key here! i like to think of it as a race against the clock. spend about 10 minutes prepping those seeds, then an additional 20- 25 minutes in the oven.
Time flies when you’re having fun, but be sure to keep an eye on those seeds!
For organization, lay everything out. i’m talking about your baking sheet, mixing bowl, and oven mitts. you don’t want to be running around, looking for stuff while those seeds are roasting.
Safety first, friends! always remember to use oven mitts when handling hot pans. ouch! that’s a lesson i learned the hard way.
Step-by-Step Process
-
Preheat Oven : First thing’s first, bump the oven up to 300° F ( 150° C) to get it nice and toasty.
-
Prepare Seeds : Clean those seeds by rinsing away the fibers. Soak them for a minute if you must, but they need to be dry before we get adventurous.
-
Season seeds : give the seeds a good drizzle of olive oil and sprinkle some sea salt . feel free to jazz them up with garlic powder or smoked paprika! toss it all together until they’re coated like a dream.
-
Prepare Baking Sheet : Grab a baking sheet and opt for parchment paper if you’re feeling fancy. Spread the seasoned seeds evenly; no one likes overcrowding in there!
-
Roast seeds : pop them in the oven and let them roast for around 20- 25 minutes . remember to stir halfway through to avoid any seed drama! you’re looking for that golden-brown color and a crunchy texture—the visual cues for doneness .
-
Cool and Serve : Drop them out of the oven (keep those mitts on!) and let them cool. Store any leftovers in an airtight container, if there are any left!
Expert Techniques
Let’s unlock the pro tips! one critical step is making sure that your seeds are thoroughly dried before roasting. it’s like bringing a water balloon to a water fight—no bueno! if you want to be adventurous, tweak your spices.
A sprinkle of chili powder? yes, please!
Quality checkpoints matter too. Check those seeds towards the end of roasting, as they can go from perfect to burnt faster than you can say “snack attack!”
Success Strategies
We all mess up sometimes. one common mistake? failing to dry the seeds! you’ll end up with a chewy mess instead of crunchy happiness.
For quality assurance, taste a few before you pull them out; after all, they should sing “nutty-flavored seeds!”
Wanna be ahead of the game? these roasted seeds are great for meal prep! you can whip up a batch on sunday and snack on them all week long.
They make fantastic salad toppers or just a quick nibble while scrolling netflix.
Wrapping It Up
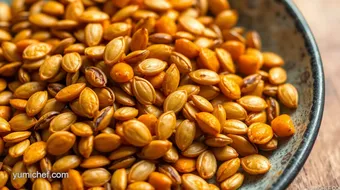
There you have it, folks! you’re now ready to roast butternut squash seeds for crunchy joy and transform those humble seeds into nutty snacks that people will rave about.
This recipe is perfect not just for your family but also for those cozy fall gatherings where everyone’s munching on healthy snacks .
Plus, they’re gluten-free and make for amazing diy snacks!
Feeling empowered? Great! Before we head off, don’t forget to save this handy recipe for those chilly autumn afternoons. Up next, we’ll dive into Additional Information that’ll keep your kitchen skills sharp and your snacks even sharper!
Roast Butternut Squash Seeds for Crunchy Joy: Your Guide to a Delicious Fall Treat
Oh my gosh, if you’ve ever carved a butternut squash, you know the real treasure lies inside those seeds! let’s talk about something special: roasting those seeds.
It’s not just about getting rid of what's leftover; it’s about transforming them into healthy fall snacks that bring joy to your taste buds.
Seriously, once you know how to roast seeds, you’ll want to make it a regular gig in your kitchen.
Pro Tips & Secrets
First off, let me give you some of my chef’s personal insights . the key to delicious, crunchy seeds is drying them really well before roasting.
If you skip this step, they’ll end up chewy instead of crunchy. and let’s be real, nobody wants chewy seeds.
So, pat those babies dry!
Time-saving techniques? Here’s the scoop: while your seeds are roasting (about 20- 25 minutes, but we’ll get to that), prep your next meal. It’s like multitasking but way more fun.
Now, flavor enhancement tips . I like to sneak in a little garlic powder and smoked paprika alongside sea salt. Oh boy, it’s like adding a gourmet touch to these nutty snacks! Want an even bigger punch? Try sprinkling on some chili powder for a spicy twist!
Presentation advice? Plating is key, especially if you're serving these crunchy seed snacks at a party. Just toss them into a cute bowl with some fresh herbs sprinkled on top, and voila! Instant wow factor!
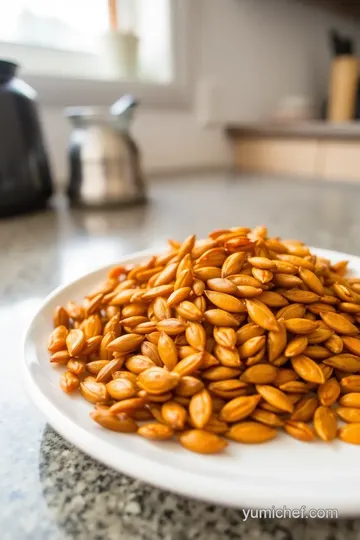
Perfect Presentation
When it comes to plating techniques , think simple but effective. i like to serve the roasted seeds in a small, clear glass dish.
This way, you can see all that golden-brown beauty.
For garnish ideas , fresh parsley or cilantro, finely chopped, adds a pop of color and freshness. Just a sprinkle goes a long way!
Speaking of color combinations , think about pairing your seeds with a vibrant autumn salad. Think greens, reds, and yellows!
To boost that visual appeal , serve with a side of hummus or guacamole. Not only is it pretty, but it also makes for a great interactive snack. Everyone can dive in!
Storage & Make-Ahead
Now, let’s talk practical stuff: storage guidelines . ideally, you should store your roasted seeds in an airtight container at room temperature.
They’ll last for about a week, but i bet you won’t be able to resist munching them all in a few days.
Preservation methods ? Honestly, you can freeze them if you make a big batch. Just ensure they’re properly sealed to keep the crunch alive.
How about reheating instructions ? if they lose a bit of their crunch, toss them back in a preheated oven for just a few minutes.
It’s like bringing a bit of that freshly roasted joy back!
Creative Variations
Once you get the hang of roasting, the possibilities open up! try flavor adaptations like cinnamon and sugar for a sweet treat, or add some cayenne for a spicy kick.
There’s no wrong way!
For dietary modifications , you can use avocado oil instead of olive oil. It has a high smoke point and brings its own unique flavor.
Got leftovers? Think about some seasonal twists ! I love mixing roasted butternut squash seeds into my fall salads, adding crunch and extra protein.
Complete Nutrition Guide
Now let’s break down the good stuff—these seeds are nutrient-dense snacks . Each serving is packed with fiber and protein, making them perfect for an energy-boosting snack .
Butternut squash has amazing health benefits . It's rich in vitamins A and C, which means you’re not just snacking but nourishing your body too.
And here’s a super transparent part: portion guidance is crucial. while they’re healthy, keep the serving to about 1/4 cup to stay on the safe side.
Trust me; it's easy to go overboard because they are so yummy!
Expert FAQ Solutions
You might have some burning questions, like, “What if my seeds are burning?” Don’t worry. Stay close and stir them around halfway through roasting to prevent any mishaps.
Another common question? “What if they aren't crunchy enough?” That’s usually due to not drying them completely or missing the roasting time. Just follow my tips, and you’ll be golden!
Wrap Up
In the end, roast butternut squash seeds for crunchy joy is not merely a snack; it’s an experience waiting to unfold in your kitchen.
These easy snack ideas are perfect for fall festivities, movie nights, or just when you need a quick clean eating snack .
So, roll up your sleeves and give this a shot—you won’t be disappointed, trust me!
Whether you’re preparing for a gathering or just snuggling up on the couch, these homemade roasted seeds will surely bring a smile to your face. Happy snacking!
Roast Butternut Squash Seeds for Crunchy Joy Card
⚖️ Ingredients:
- 1 cup butternut squash seeds, cleaned and dried (about 1 medium squash / 250 g)
- 1 tablespoon olive oil (15 ml)
- 1 teaspoon sea salt (5 g)
- Optional: 1/2 teaspoon garlic powder (2 g)
- Optional: 1/2 teaspoon smoked paprika (2 g)
🥄 Instructions:
- Step 1: Preheat your oven to 300°F (150°C).
- Step 2: Clean the butternut squash seeds by removing the fibrous strands and rinsing them under cold water. Pat seeds dry with a paper towel.
- Step 3: In a mixing bowl, combine the dried seeds, olive oil, salt, and optional seasonings. Toss well to ensure even coating.
- Step 4: Line a baking sheet with parchment paper (if using). Spread the seasoned seeds in a single layer on the baking sheet.
- Step 5: Roast in the preheated oven for 20-25 minutes, stirring halfway through to ensure even roasting. Look for a golden-brown color and a crunchy texture as visual cues for doneness.
- Step 6: Remove from oven and let cool before enjoying. Store any leftovers in an airtight container.
Previous Recipe: Delicious Cooked Oats with Coconut Milk & Sweet Maple: Your Morning Bliss Awaits!
Next Recipe: How to Blend Fresh Spinach into Luscious Pesto: My Favorite Recipe