Quick Pickled Quail Eggs
Have you tried making Quick Pickled Quail Eggs - Tangy & Delicious? These easy bites burst with flavor and are perfect on salads or charcuterie boards. Let's dive in!

- A Tangy Adventure: Quick Pickled Quail Eggs - Tangy & Delicious
- From Tradition to Trend: The Story Behind the Recipe
- The Perks of Pickling: Why You’ll Love This Recipe
- Next Up: Let’s Talk Ingredients!
- Essential Ingredients Guide
- Getting Ready for Gourmet Goodness
- Pro Tips & Secrets for Quick Pickled Quail Eggs
- Perfect Presentation for Your Pickled Eggs
- Storage & Make-Ahead
- Creative Variations
- Complete Nutrition Guide
- Frequently Asked Questions
- Recipe Card
A Tangy Adventure: Quick Pickled Quail Eggs - Tangy & Delicious
Oh my gosh, i still remember the first time i tasted quick pickled quail eggs . it was at my buddy’s place during a casual game night.
You know those moments that just stick with you? yeah, this was one of them. he served these vibrant little eggs on a charcuterie board, and i couldn’t help but wonder what magic was behind that tangy flavor .
It was a simple snack, but it blew my mind! now, i've got to share this amazing recipe with you, because folks, these tangy quail eggs are the bee’s knees for any gathering.
From Tradition to Trend: The Story Behind the Recipe
So, let’s take a little trip down memory lane and talk about how these beauties came to life. pickling is one of those ancient methods that has been around longer than we can imagine—like, think of the romans and their vinegar-preserved goodies.
Now, fast forward to the present where pickled quail eggs have made a major comeback. they're not just a hipster foodie trend; they’re becoming a must-have on charcuterie boards everywhere! honestly, who wouldn’t want a gourmet snack that’s as easy as pie?
Making these quick pickled quail eggs doesn't require too much time or any high-level cooking skills. we're talking just about 50 minutes from start to finish , and most of that is chilling time! they come together with just a bit of boiling, some patience, and a few essential pickling ingredients you'll likely have at home.
Plus, you’re not breaking the bank here; these eggs are pretty affordable, usually packed with around 12 eggs for a modest price.
The Perks of Pickling: Why You’ll Love This Recipe
First off, let’s chat health. did you know that quail eggs pack a serious punch when it comes to nutrition? they are higher in protein and nutrients than chicken eggs.
So, not only are these homemade pickled snacks delicious, but they're also kinda good for you too—win-win! plus, they make for a great conversation starter at parties!
If you're into hosting, these pickled beauties are perfect for special occasions. serve them up on game days, picnics, or any festive gathering! talk about a crowd-pleaser! they also have that unique twist, compared to traditional pickled eggs, that makes them extra special.
With their vibrant color and tangy flavor profiles , they brighten up any appetizer spread.
Now, let’s not forget about the ways you can get creative with them! want to spice it up? toss in some red pepper flakes for that extra kick.
Or maybe, throw in fresh herbs for aromatic flair! you could even make some fun quick pickle ideas just by switching up the brine ingredients.
Honestly, my friends are always blown away by how versatile a simple recipe can be.
Next Up: Let’s Talk Ingredients!
So, if you’re itching to dive into making these quick pickled quail eggs, stay tuned! we’re about to break down the easy peasy ingredients that even the most novice cook can totally handle.
It’s time to gather your supplies and step into this fun little world of pickling! from basic eggs to flavorful brines, you're just a few steps away from the best tangy snack you’ll ever make.
Trust me; your taste buds are going to thank you!
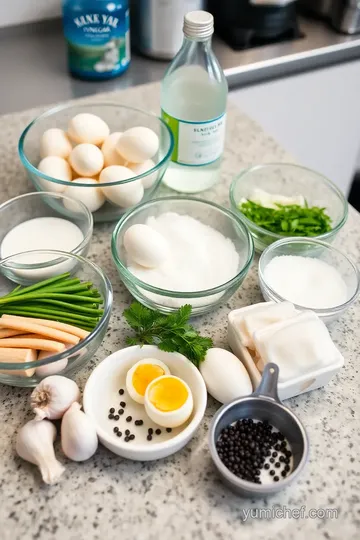
Essential Ingredients Guide
Alright, food lovers! let’s dive into the delicious world of quick pickled quail eggs and talk about the essential ingredients to get us started on our pickling adventure.
You’re gonna love how easy it is to create tangy flavors that brighten up any dish.
Premium Core Components
When it comes to making pickled goodies, you need to know the premium core components that’ll make your pickled quail eggs sing.
First, let's chat about measurements . for those of us in america, we usually stick with cups and tablespoons, but just to keep it simple, 1 cup equals about 240 ml for our metric friends.
You’ll need 1 cup white vinegar , 1 cup water , 2 tablespoons sugar , and 1 tablespoon salt for the brine.
Now, how do you know if your ingredients are good quality? Always check for freshness! Your vinegar should smell sharp, but pleasant. And your spices? Fresh ones really elevate your pickling game.
Storage guidelines are crucial. keep your leftover brine sealed in the fridge and use it within 2-3 weeks . that way, you don’t end up with funky flavors.
Speaking of freshness, when picking ingredients, look for vibrant colors and crisp textures—this makes all the difference, trust me!
Signature Seasoning Blend
Now let’s spice it up! the beauty of quick pickling lies in the seasonings. for our tangy quail eggs , essential spice combinations include black peppercorns , garlic , and a pinch of red pepper flakes if you’re feeling feisty.
Herbs play a huge role, too! fresh dill or thyme perfectly complements the quail eggs. if you go for a regional twist, why not try some cilantro or green onions ? experiment, and don’t be afraid to mix it up; the right blend can really bring flavor to the table.
Smart Substitutions
Let’s be honest; sometimes, you don’t have all the ingredients on hand. fear not! that’s where smart substitutions come in handy.
If you're short on white vinegar , apple cider vinegar works wonders too. you can even swap out sugar for honey for a more natural sweetness.
If dietary needs are a concern, maybe you're crafting a quick snack for your gluten-free friends—no problem! these pickled eggs are naturally gluten-free and are a great way to level up your homemade pickled snacks .
For those in a pinch, even eggs from your local farm can save the day.
Kitchen Equipment Essentials
Oh, and let’s not forget about the gear you’ll need. you don’t have to break the bank on fancy tools; a small saucepan, measuring cups, and a good old jar will do just fine.
If you’re feeling a little wild, you might want to grab a mason jar for aesthetics.
When preparing your pickles, keep your workspace clean. this means having all those ingredients and tools handy so you don’t end up scattering everything everywhere.
Trust me, i’ve been there, and a messy kitchen can feel like a culinary nightmare!
The Perfect Transition to Quick Pickled Quail Eggs
So there you have it, my friends! understanding these key ingredients, spices, and cooking tools makes the process so much more enjoyable.
And now that we've set the stage, let's jump into the fun part—the actual recipe for quick pickled quail eggs - tangy & delicious .
You’ll not only appreciate the tangy flavor profiles but also impress your friends and family with your newfound pickling skills.
Trust me, these little bites make for the perfect appetizer recipes or a tasty addition to any charcuterie board .
Get ready to pickle!
Getting Ready for Gourmet Goodness
Alright, my friends! let's dive into the world of culinary arts with a focus on a surprisingly simple yet jaw-dropping dish: quick pickled quail eggs - tangy & delicious .
I’ll spill the beans on some essential preparation steps and reveal how to conquer those pesky kitchen tasks like a pro.
You’ll feel like you just stepped out of culinary school (minus that hefty student loan, right?).
Essential Prep Steps
First off, mise en place (fancy french for “everything in its place”) is key! before you get your pickling on, gather all your ingredients and tools.
Trust me, you don’t want to be scrambling for that jar or measuring spoon while your eggs are boiling.
Next, let’s talk time management . for this recipe, you’ll need about 50 minutes total ( 15 minutes prep, 5 minutes cooking, and at least 30 minutes for chilling).
Set yourself a little timer; it helps keep you on track and keeps that kitchen vibe flowing!
Now, organization is super crucial, especially if you’re juggling multiple dishes. i like to tidy my workspace as i go.
Less mess means more focus. and hey, safety tip: be careful when boiling those eggs! keep your pot on the back burner, and watch those bubbles.
Spills are no fun.
Step-by-Step Process
Let’s break it down into easy steps, shall we? Here’s the clear, numbered way to get those delicious pickled quail eggs ready:
-
Boil and Ice Bath: Boil your quail eggs for 4 minutes . Yep, just 4! Then, transfer them to an ice bath—this makes peeling a breeze!
-
Simmer your brine: in a saucepan, combine 1 cup of white vinegar , 1 cup of water , 2 tablespoons of sugar , and the rest of your spices.
Bring that delicious mixture to a simmer over medium heat. don’t leave it alone; you want those flavors to meld and the sugar to dissolve.
-
Cool It Off: Remove the brine from heat and let it cool slightly. This is key! You don’t want to pour boiling liquid over your lovely eggs.
-
Pack ‘em in: grab a clean jar and pack those peeled quail eggs in there. pour that tangy brine over the top, until they’re fully submerged.
Toss in some fresh herbs if you’re feeling zesty.
-
Chill out: seal that jar tight and toss it in the fridge. let it chill for at least 30 minutes , but if you can wait longer, you’re in for a flavor explosion.
Expert Techniques
Wanna elevate your pickling game? Here are a few expert techniques to keep in mind:
-
Embrace Flavor Profiles: A common mistake is underestimating spices. Don’t shy away from experimenting with fresh herbs or even some garlic!
-
Taste as You Go: Play around with your brine. If it needs more heat, toss in some red pepper flakes . Love sweetness? Maybe add a little more sugar! Your palate rules!
-
Quality Check: Always ensure that your eggs are perfectly peeled—they absorb flavors better that way, and trust me, the presentation matters too!
Success Strategies
Ah, the sweet taste of success! Here are a few tips to nail your pickled quail eggs:
-
Avoid common pitfalls: one biggie is not letting them pickle long enough. hang tight and let those flavors develop! you want to let them sit for at least 24 hours for maximum impact.
-
Quality Assurance: Always make sure your jar is clean and well-sealed to prevent spoilage.
-
Make-ahead magic: the great thing about pickled eggs is they’re fantastic make-ahead snacks for parties. they’ll last in the fridge for up to 2-3 weeks , so you can prepare them whenever you want.
Now that you're armed with all the insider info, you can whip up these quick pickled quail eggs like a feisty chef! and can i say? they are the perfect addition to any charcuterie board or as part of your appetizer recipes lineup.
Feeling inspired? Well, there's more fun stuff coming up in the last section: Additional Information. Get ready to become the ultimate host with these culinary tricks up your sleeve!
Pro Tips & Secrets for Quick Pickled Quail Eggs
Let me just say, quick pickled quail eggs - tangy & delicious are a total game changer for your snack game! the pickling process makes them rich in flavor and they can be a real crowd-pleaser.
Here’s how to make the process even better.
Chef's Personal Insights
First off, you want to make sure you’re using fresh quail eggs . trust me, if you can find them at a local market, grab ‘em! the freshness speaks volumes in flavor.
Oh, and don't skip on the essential pickling ingredients —quality vinegar, spices, and herbs will transform your eggs from "meh" to "wow".
Time-Saving Techniques
Now, i get it—time is of the essence. to speed things up, hard-boil a batch on a sunday and pickle them throughout the week.
You could have a tasty snack or salad topper ready to go at a moment’s notice!
Flavor Enhancement Tips
Want to spice things up? adding sliced jalapeños or some fresh herbs like dill gives your eggs an exciting twist.
You can even play with the vinegar preserving methods by experimenting with apple cider vinegar for a sweeter, fruitier profile.
Don't be afraid to test out some gourmet flavors!
Presentation Advice
Okay, let’s talk aesthetics. you don’t just want tasty snacks; you want them to look good! a stunning charcuterie board with your homemade pickled snacks will wow your guests.
Use a clear jar for showing off those vibrant quail eggs and try to layer the color combinations by adding herbs or spices in between the layers.
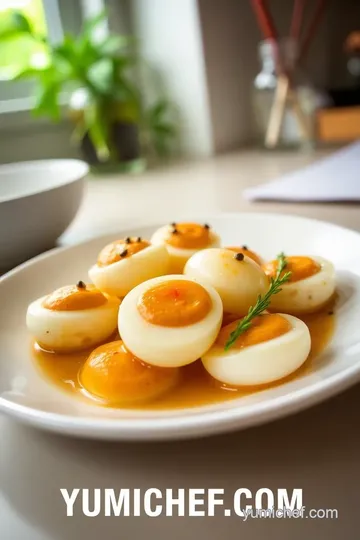
Perfect Presentation for Your Pickled Eggs
Serving food is all about that first wow factor.
Plating Techniques
When you’re ready to serve, line your platter with some sprigs of fresh herbs. it not only adds flavor but creates a gorgeous pop of green that’ll draw people in.
Pro tip : always have some colorful garnishes like sliced radishes or edible flowers to turn heads.
Garnish Ideas
Think about toppings that’ll add a crunch! Crushed peppercorns or sesame seeds can be fun sprinkled on top. It’s all about layering those textures!
Visual Appeal Tips
Color is key. Those vibrant, tangy quail eggs will stand out against a rustic platter of cheeses. And don't forget to throw in some crunchy veggies on the side for that added pop!
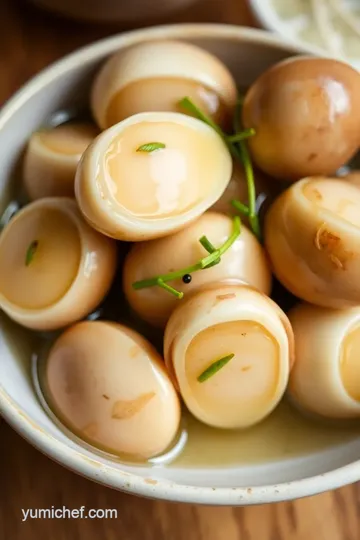
Storage & Make-Ahead
These eggs are not just a “one-night only” deal.
Storage Guidelines
Store in a sealed jar in the fridge. They can last about 2-3 weeks . But you’ll probably finish them before then, trust me!
Preservation Methods
Want them to last longer? Learn about some egg preservation techniques . While they won’t last forever , the right pickling brine can keep them tangy and fresh for those surprise guests!
Freshness Duration
Check for any odd odors or colors to ensure they're still good. Ideally, the longer they pickle, the better they’ll get—let them hang out for 24 hours for rich flavor!
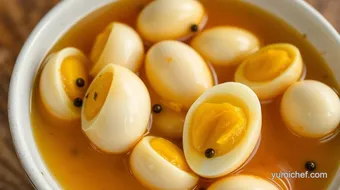
Creative Variations
Let’s mix it up!
Flavor Adaptations
You can create unique quail egg dishes by experimenting with different brines. Try using beet juice for a cool color, or even add some garlic cloves for a more robust flavor experience.
Seasonal Twists
Use fresh herbs that are in season. Think about fresh dill in spring or rosemary in fall! The evolving seasons let you get creative.
Dietary Modifications
For something lighter, go easy on the sugar or use a natural sweetener instead.
Complete Nutrition Guide
Don’t forget: these little bites pack some benefits!
Detailed Breakdown
Each egg is loaded with nutrients. You get a protein boost and all that goodness makes them a great addition to your snacking routine.
Health Benefits
Quail eggs are rich in vitamins, minerals, and essential fatty acids. They’re a perfect alternative for those who are sensitive to chicken eggs!
Portion Guidance
Just a few make for a delicious snack or appetizer. Focus on serving around 2-3 per person for the ultimate experience.
So there you have it! whether you’re chowing down on these delicious egg-based snacks at home or whipping them up for a gathering, these quick pickled quail eggs are all about bringing that tangy flavor profile into your life.
Don't forget to experiment and make it your own. you’ll be amazed at how fun and easy pickling can be! just dive in, keep it simple, and enjoy your food adventures! you got this!
Frequently Asked Questions
What are Quick Pickled Quail Eggs - Tangy & Delicious best served with?
Quick Pickled Quail Eggs are versatile and pair wonderfully with salads, charcuterie boards, or as a standalone snack. They can also be added to sandwiches or served alongside appetizers for a unique twist. Enjoy them with a refreshing beverage such as sparkling water or craft beer to complement their tangy flavor.
How long do Quick Pickled Quail Eggs last in the refrigerator?
When stored in a sealed jar in the refrigerator, Quick Pickled Quail Eggs can last for 2-3 weeks. It's essential to keep them submerged in the brine for the best preservation. Make sure to check for any off smells or changes in appearance before consuming.
Can I use other types of eggs instead of quail eggs for pickling?
Yes, you can use chicken, duck, or other types of eggs if you prefer, though the pickling time and flavor may vary slightly. Keep in mind that larger eggs may require a longer pickling time to achieve the same depth of flavor as the quail eggs. Adjust the brine quantities according to your batch size!
What variations can I try with the pickling brine?
You can customize your pickling brine by adding ingredients like sliced jalapeños for heat, beets for color and sweetness, or different herbs like thyme or basil for a unique flavor. Experimenting with different vinegars, such as apple cider or red wine vinegar, can also yield delicious results.
Do I need any special equipment to make Quick Pickled Quail Eggs?
No special equipment is needed! You just need a small saucepan for the brine, a mixing bowl, and a jar or airtight container for storing the eggs. Ensure that whatever container you use is clean and well-sealed to maximize the pickling process.
Quick Pickled Quail Eggs Card
⚖️ Ingredients:
- 1 cup white vinegar
- 1 cup water
- 2 tablespoons sugar
- 1 tablespoon salt
- 1 teaspoon black peppercorns
- 2 cloves garlic, crushed
- 1 teaspoon red pepper flakes (optional)
- Fresh herbs (optional, e.g., dill or thyme)
- 12 quail eggs, hard-boiled and peeled
🥄 Instructions:
- Step 1: Boil quail eggs for 4 minutes until hard-boiled; transfer to an ice bath to cool. Peel the eggs carefully and set aside.
- Step 2: In a small saucepan, combine vinegar, water, sugar, salt, peppercorns, garlic, and red pepper flakes. Bring to a simmer over medium heat until sugar and salt are dissolved. Remove from heat and let it cool slightly.
- Step 3: Place the peeled quail eggs in a clean jar or airtight container. Pour the warm pickling brine over the eggs, ensuring they are fully submerged. Add fresh herbs if using.
- Step 4: Seal the jar tightly and let the eggs chill in the refrigerator for at least 30 minutes (the longer they sit, the more flavorful they become).
- Step 5: Enjoy as a snack, in salads, or as part of a charcuterie board.
Previous Recipe: Discover the Easy Way to Make Quick Elote Pasta Salad with Creamy Goodness
Next Recipe: How to Make Microwave Fresh Pumpkin Cake in 15 Minutes: So Easy and Delicious!