Pampered Chef Ice Cream Recipe
Looking for a pampered chef ice cream recipe? Discover how to create easy, creamy homemade ice cream with fresh fruits and delightful mix-ins! Try it today.

- Are You Ready to Chill?
- The Sweet Story Behind Ice Cream
- Why You Should look into Right In
- Health and Nutrition Highlights
- Recipe at a Glance
- Essential Components Guide
- Kitchen Equipment Essentials
- Perfect Cooking Technique for Heavenly Homemade Ice Cream
- Game-Changing Tips
- Perfect Presentation
- Storage and Make-Ahead
- Creative Variations
- Complete Nutrition Guide
- Expert FAQ Solutions
- Recipe Card
Are You Ready to Chill?
Have you ever thought about how incredible it would be to whip up your own ice cream right at home, just like the ones from your favorite ice cream shop? imagine indulging in a creamy, dreamy scoop of heavenly homemade ice cream with flavors that you can customize yourself.
Sounds dreamy, doesn't it?
Well, i've got something special for you today! this pampered chef ice cream recipe is not just any old dessert; it’s an easy-to-make treat that’s perfect for hot summer days or cozy winter nights–whenever the mood strikes you.
It comes together in about 45 minutes (not including freezing time!), and trust me, it's super easy - even little ones can help out.
Can you picture gathering around with the family, mixing and matching your favorite flavors? it's all about making memories, and this recipe nails it.
The Sweet Story Behind Ice Cream
Now, let’s take a dive into the history of ice cream. believe it or not, the origins of this beloved sweet treat can be traced back to ancient china where they blended milk with rice and snow.
Fast forward a few centuries, and we find ourselves in the courts of italy and france, where flavors started to evolve with egg custards or flavored syrups.
In modern times, ice cream has become a cultural symbol of summer vacations and childhood whimsies, but its roots remind us of how food brings us together.
And speaking of bringing us together, this pampered chef ice cream recipe not only boasts rich culinary heritage but allows you to connect with your loved ones through the sheer joy of creating something special together.
Why You Should look into Right In
So why will you fall in love with this version, in particular? first off, it combines classic vanilla with customizable, foolproof techniques that can take your creativity to new heights.
You can just as easily make it a fresh fruit ice cream , or toss in some chocolate chips for a little decadence.
Plus, you get to experiment with all kinds of flavor variations depending on what’s in season or what tickles your fancy that day!
This isn't just your average diy ice cream. it’s like having an ice cream party in your kitchen! you don't need fancy gadgets either; the basic ice cream maker instructions will have you spinning up this indulgent goodness in no time.
Health and Nutrition Highlights
Now, i know what you’re thinking: "can indulging in something so delicious be good for me?" believe it or not, yes! this homemade creation is packed with rich dairy goodness, giving you a healthy dose of calcium and protein.
Plus, because it’s made from fresh ingredients, there's no need for artificial flavors or preservatives, making it a win for wellness.
But if you're keeping an eye on dietary needs, you can easily customize it with nut milk or natural sweeteners to tune it to your lifestyle. Who wouldn’t love that?
Recipe at a Glance
- Total preparation time : Approximately 45 minutes (plus freezing time)
- Skill level required : Easy
- Serving size : Yields 4-6 generous servings
- Cost efficiency : Super budget-friendly, especially compared to those fancy ice cream shops!
So, if you've been eyeing that ice cream maker gathering dust, it's high time to dust it off and treat yourself to something spectacular.
Next up, let’s dive into the essential ingredients that will have you looking like a kitchen superstar in no time! this pampered chef ice cream recipe is all about indulgent flavor combinations and easy steps that even the kids can get in on.
Ready to get started? let’s go whip up some creamy homemade treats!
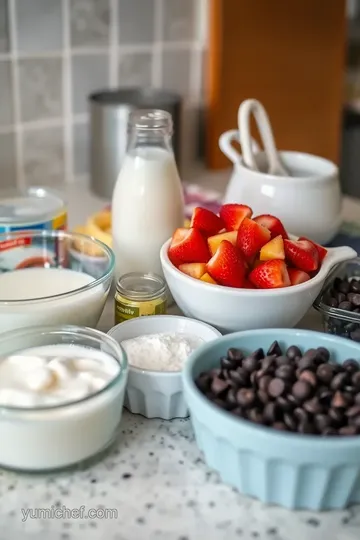
Essential Components Guide
Hey there! let’s dive into the must-have ingredients that will elevate your ice cream making game! whether you’re craving something creamy, fruity, or just downright decadent, you can always count on solid ingredients to jet-set your homemade dessert to new heights.
Trust me, as someone who's plopped down countless bowls of ice cream, it’s all about the quality.
Premium Core Ingredients
When you’re whipping up something as delightful as homemade ice cream , you want to start with premium core ingredients . Here’s the rundown:
-
Detailed measurements : for our pampered chef ice cream recipe , you’ll need 2 cups of heavy cream, 1 cup of whole milk, ¾ cup of granulated sugar, and a splash of vanilla extract.
Exact measurements make all the difference.
-
Quality indicators : look for heavy cream that’s fresh and not about to expire. the milk should be cold and creamy; you’ll know it’s good when it feels rich.
Granulated sugar? just make sure it’s granulated and not powdered—no fun in icy clumps!
-
Selection tips : head to your local farmer's market if you can. fresh ingredients always bring out those flavorful ice cream options we love.
Plus, you can snag some fresh fruit for mix-ins.
-
Storage Guidance : Keep your dairy goodies in the coldest part of your fridge and use them within a week for the best results!
Signature Seasoning Blend
Next, let’s talk about signature seasoning blends . These aren’t typically in ice cream, but hear me out:
-
Spice Combinations : You can get clever by adding a hint of cinnamon or nutmeg to your base. You’ll hardly believe how this uplifted flavor can tantalize your taste buds.
-
Herb Selections : Think about adding a basil-infused simple syrup for a touch of summer. It’s a game-changer.
-
Flavor Enhancers : A little pinch of salt elevates sweetness. Trust me; it’s the secret weapon of creamy homemade treats .
-
Aromatic Additions : Want to stand out? A splash of orange zest can jazz things up!
Smart Substitutions
Now, let’s not forget to discuss smart substitutions ! Sometimes, life throws a curveball, and you may not have everything on hand. No worries:
-
Alternative Options : Don't have heavy cream? Use coconut milk for a nutritious homemade dessert option!
-
Dietary Swaps : Health-conscious? Swap out granulated sugar for honey or maple syrup—the flavors will deepen in your easy ice cream recipe .
-
Emergency Replacements : Ran out of vanilla? A dash of bourbon will add a warm depth to your ice cream. (Just make sure the kids steer clear!)
-
Seasonal Variations : Use whatever fruit is in season—think fresh peaches or strawberries during summer months.
Kitchen Equipment Essentials
Alright, let’s chat about the kitchen equipment essentials . You don’t need a fancy set-up, but a few tools will make life easier:
-
Must-have Tools : Invest in an ice cream maker. Trust me; it’ll change your dessert game forever.
-
Recommended Appliances : If you’re on a budget, you can use a hand mixer or whisk to mix everything—just make sure you chill everything well for that smooth ice cream technique .
-
Helpful Gadgets : A silicone spatula and a good storage container will save you when it comes to perfect scoops and minimizing ice crystals.
-
Home alternatives : couldn’t snag an ice cream maker? no worries! pour your mix into a shallow dish and freeze.
Stir every half-hour till you hit that creamy goodness (it just takes a bit longer).
Pro Ingredient Tips
So, what are the pro ingredient tips you need before embarking on this ice cream adventure ?
-
Selection Secrets : Organic dairy products are often richer. If you want a simple yet gourmet homemade ice cream, this is essential.
-
Quality Markers : Check for high butterfat content in cream—aim for 36% or higher.
-
Storage Solutions : Airtight containers are crucial to avoid icy surprises once your dessert is frozen.
-
Money-saving Tips : Buy in bulk—sugar and salt will always be used, especially with sweet desserts around the house.
And just like that, you’re armed with the knowledge to go forth and create some incredible DIY ice cream at home!
Stay tuned for the next section where I’ll lay out the simple instructions for crafting your very own Heavenly Homemade Ice Cream . Trust me, you’re gonna love this!
Perfect Cooking Technique for Heavenly Homemade Ice Cream
So, the other day, i found myself daydreaming about that creamy, dreamy goodness we all associate with a hot summer’s day—ice cream.
Not just any ice cream, mind you, but homemade ice cream straight from my kitchen. and let me tell you, heavenly homemade ice cream based on a pampered chef ice cream recipe is probably the easiest and most delightful thing you can whip up in under an hour.
Seriously, it’s like an instant ticket to summer, even if it's peering out from behind a winter window! let’s dive into the perfect cooking technique , so you can nail it at home!
Essential Preparation Steps
To avoid the inevitable chaos that sometimes ensues in the kitchen, let’s break down the essential prep steps that make this journey smooth like your future ice cream.
First things first, mise en place is your friend here. that fancy french term just means having everything ready before you start, so pull out your ingredients: heavy cream, whole milk, sugar, vanilla extract, and a pinch of salt .
Once you have everything gathered, give each ingredient a quick measure. no one wants to be scrambling for sugar when you’re in the zone! oh, and let’s not forget about time management .
You want to set aside about 15 minutes for prepping and about 30 minutes for chilling your mixture. it’s paramount to stay organized—try to keep those measuring cups nice and tidy.
Professional Cooking Method
Now, on to the step-by-step process. it’s easy-peasy! start by mixing 2 cups of heavy cream , 1 cup of whole milk , and ¾ of a cup of sugar in a nice, big mixing bowl .
Give it a solid whisk until the sugar dissolves and it’s all smooth and luscious!
Next, we’ve got to chill this bad boy for at least 30 minutes . cover it with plastic wrap and pop it in the fridge.
Honestly, while you're waiting, you can binge that show you’ve been meaning to catch up on—multitasking at its finest!
When you’re ready to churn, pour that chilled mixture into your ice cream maker . most machines will take about 20-30 minutes , so keep an eye on the consistency.
You want it to get nice and thick. if you’re feeling adventurous, throw in your mix-ins , such as chopped strawberries or chocolate chips, during the last few minutes of churning.
After churning, transfer to an airtight container and freeze that baby for at least 4 hours , or until it’s as solid as a winter’s night.
Success indicators? well, once you can scoop it easily but it isn’t rock-hard, you’re golden!
Expert Techniques
Now, listen up. there are a few expert techniques to ensure you’re on the right track. first, always chill your mixing bowl and ice cream maker.
This little hack makes a huge difference in texture—creamy versus icy can hinge on that!
Another critical step is monitoring your temperature. keep your ice cream maker at the suggested freezing temperature for the perfect result.
Lastly, check the mixture often as it churns. if it starts holding its shape, give it a pause!
Success Strategies
As with anything, it’s not all smooth sailing. if your ice cream ends up a bit icy, you might have over-churned it—don’t worry, it happens! simply ensure you stop the churning before the mixture gets stiff.
And, if you find that your flavor could use a boost, you can always sprinkle in a touch more vanilla or concoct some ice cream flavor variations that tickle your fancy (chocolate, anyone?).
Make sure to store your ice cream properly to avoid freezer burn. Use a piece of parchment paper pressed against the ice cream's surface in your container—it works wonders!
So there you have it! you’re ready to embark on making your own creamy homemade treats that will make you the star of any ice cream party .
With all this in mind, you might be itching to explore different variations or perhaps even no-cook ice cream recipes!
In the next section, I'll be sharing more easy ice cream recipes , tips on delicious ice cream mix-ins , and ideas for refreshing chilled dessert recipes perfect for summer gatherings! Stay tuned, friends—it's about to get even sweeter!
Game-Changing Tips
Oh my gosh, let me tell you a little secret about homemade ice cream that i learned after many not-so-great attempts.
Using the right techniques is everything! when you're trying your hand at a pampered chef ice cream recipe , a few professional insights can totally change the game.
First off, chilling your mixing bowl and ice cream maker beforehand? absolute must! this little step can create that smooth ice cream texture we all strive for.
And if you want expert techniques, pay attention to the temperature of your dairy as well. you want everything cold, but not frozen!
Here’s some kitchen wisdom i stumbled upon: if you’re feeling adventurous, take a cue from those easy ice cream recipes you see online where they suggest adding mix-ins during the last few minutes of churning.
Trust me, you get those little bites of joy that make every scoop worth it!
And for success guarantees? Well, making sure you don’t over-churn is a biggie. Ice cream can go from creamy to icy faster than you can say “It's melting!”
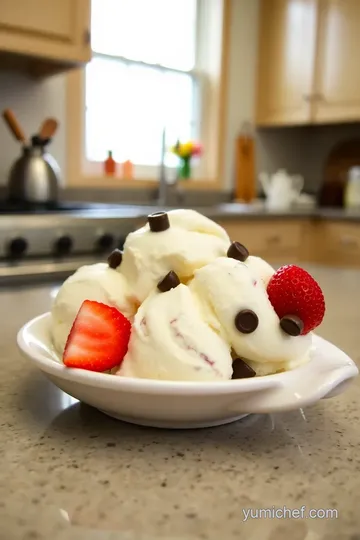
Perfect Presentation
Now, let’s talk about plating techniques . i mean, what’s the point of all this deliciousness if it doesn’t look good, right? a simple scoop in a lovely bowl or a cone can be jazzed up with a drizzle of chocolate sauce or a sprinkle of crushed nuts.
You could even serve your ice cream atop a warm brownie for a fabulous dessert duel.
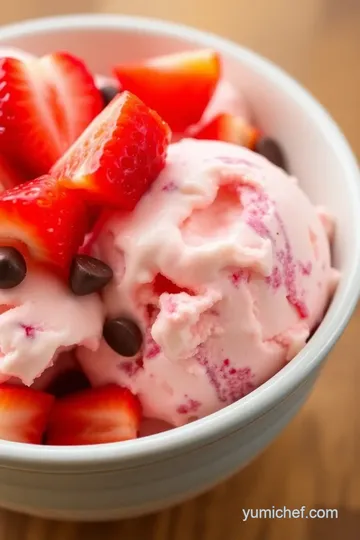
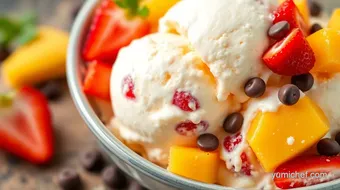
As for garnish ideas , fresh mint leaves add a pop of color and that refreshing aroma. you’ll feel fancy, i promise! and making ice cream visually appealing can be as simple as using vibrant fruits.
Fresh fruit ice cream can be both colorful and tasty—think berry swirls or chunks of mango peeking out.
Storage and Make-Ahead
One of the best things about this pampered chef ice cream recipe is that it can be made ahead! after you churn it up, just pop your ice cream into an airtight container .
Ice cream storage tips ? layer a piece of parchment paper on top before sealing. it helps to keep those pesky ice crystals at bay.
For preserving that creamy goodness, be sure your ice cream is frozen for at least four hours before you dig in.
And reheating? the beauty of homemade treats for summer is you can simply scoop and enjoy right from the freezer—no need for reheating.
Creative Variations
Now, you might be wondering how to mix things up a bit. well, flavor adaptations are where the real fun begins! not into vanilla? how about trying a chocolate ice cream with a swirl of peanut butter? oh, and did i mention seasonal twists ? think pumpkin spice in the fall or a refreshing lemonade flavor for summer.
You’re likely to have a plethora of ice cream flavor variations at your fingertips! and for those with dietary restrictions, sub in coconut milk for a dairy-free option.
There’s every excuse to get creative and make those family-friendly recipes to show off to your friends.
Complete Nutrition Guide
Okay, let’s get into the nitty-gritty of this sweet treat. Each serving of your homemade ice cream can pack in around 250 calories , which isn’t too shabby when you consider the joy it brings!
This heavenly concoction brings some health benefits if you use fresh fruit . not only does it add flavor, but it also adds nutrients and fiber, too! and as a bonus, you can control your portions since you make it yourself.
When it comes to dietary information , simply reduce the sugar or play with the ice cream mix-ins to cater to your preferences.
Moderation is key, but remember—this is a treat, and treats are meant to be enjoyed!
Expert FAQ Solutions
You might have a few concerns popping up while making your ice cream. what if it doesn’t churn? how do i know if it's over-churned? honestly, if you run into a snag, just don’t panic! if it’s not churning well, it could be that your mix wasn't cold enough.
For troubleshooting, here’s a tip: If it gets too icy, leave it out for a few minutes before serving. It’ll soften just enough for that perfect scoop .
Success tips? Use a smooth ice cream technique while churning, and periodically check for the consistency you want. That’s it—the only worry you should have is about how to keep your friends from stealing scoops before you get to it!
In conclusion, making homemade ice cream can be both a rewarding and delicious experience. whether you opt for classic vanilla or go for creative variations with seasonal flavors, you're bound to enjoy crafting this delightful dessert.
Now go ahead, gather the kids, break out those pampered chef kitchen tools , and get started on a fun ice cream adventure full of laughter and yummy treats!
Pampered Chef Ice Cream Recipe Card
⚖️ Ingredients:
- 2 cups heavy cream
- 1 cup whole milk
- 3/4 cup granulated sugar
- 1 tablespoon pure vanilla extract
- 1/2 teaspoon salt
- 1 cup chopped fresh fruit (strawberries, mangoes, etc.)
- 1/2 cup chocolate chips
🥄 Instructions:
- Step 1: In a mixing bowl, combine heavy cream, whole milk, granulated sugar, vanilla extract, and salt. Whisk until the sugar is dissolved and the mixture is smooth.
- Step 2: Cover the mixture with plastic wrap and refrigerate for at least 30 minutes until thoroughly chilled.
- Step 3: Pour the chilled mixture into the ice cream maker and churn according to the manufacturers instructions (usually about 20-30 minutes). During the last few minutes of churning, add any desired mix-ins such as fresh fruit or chocolate chips.
- Step 4: Transfer the churned ice cream to an airtight container. Freeze for at least 4 hours or until solid.
- Step 5: Scoop and serve the ice cream in bowls or cones. Enjoy!
Previous Recipe: Houston Chef for Small Bites Check Salad: 5 Easy Tex-Mex Salad Ideas!
Next Recipe: Chefs Barbeque Ribs in a Pressure Cooker Recipe: The Best Tender Ribs You'll Love!