Delightfully Blue Jam Garlic Aioli Recipe
Ever wondered how to create the perfect balance of sweet and savory? Mixing Blue Jam Garlic Aioli Delightfully is my secret! Let's dive in and elevate your meals.

- A Flavor Journey Begins
- The Backstory of Blue Jam Aioli
- Benefits That Make You Go Wow
- Essential Ingredients Guide: Elevate Your Culinary Game!
- Elevate Your Dips with Blue Jam Garlic Aioli
- Pro Tips & Secrets to Elevate Your Aioli Game
- Perfect Presentation for a Showstopper
- Storage & Make-Ahead Strategies
- Creative Variations to Explore
- Complete Nutrition Guide for the Healthy Eaters
- Expert FAQ Solutions for Common Concerns
- Recipe Card
A Flavor Journey Begins
Honestly, have you ever tried mixing something that sounds wild, but then it just works ? i remember the first time i whipped up mixing blue jam garlic aioli delightfully in my kitchen.
I was feeling creative one afternoon and wondered what would happen if i tossed together a classic garlic aioli and some blue jam.
At first, it felt like a culinary leap of faith—but oh my gosh, the flavor explosion that came out of it was mind-blowing!
Now, for those not familiar, aioli is this creamy, dreamy garlic sauce that’s a total show-stopper for sandwiches or dipping veggies.
You might think, “really, blue jam?” but trust me, it takes this aioli to a whole new level of sweet and savory goodness.
The Backstory of Blue Jam Aioli
So, where does this wild combination even come from? traditionally, aioli hails from the mediterranean, with garlic and olive oil doing the heavy lifting.
Fast forward to today, and there's a trend of mixing up flavors to create unique aioli flavors that really catch your attention.
This is where our blue jam enters the stage—bringing a fruity twist that’s perfect for those late summer bbqs or a relaxed dinner party.
Why This Aioli Matters Now
With so many folks cooking at home these days, mixing blue jam garlic aioli delightfully fits right in with the modern trend of fresh ingredient cooking .
It’s not just a fun recipe; it’s a way to elevate favorite comfort foods. and don’t worry about complexity: it’s a medium difficulty level .
You'll be mixing, emulsifying, and probably squealing in delight with that first bite.
Plus, making this aioli isn’t going to break the bank—let’s talk cost considerations . most ingredients are things you likely have in your pantry or can grab easily at the store.
When all is said and done, this one yields about a cup —plenty for dipping, sandwiches, or even slathering on grilled veggies.
Benefits That Make You Go Wow
Let’s slide into the benefits of this magical sauce. first off, it’s got health benefits and nutrition highlights that can’t be ignored.
Yes, it's creamy and rich, but you’re also getting some antioxidants from the garlic and the fruity undertones of the blue jam.
It’s not just another condiment; it’s a gourmet sauce recipe that packs a punch in flavor while still being relatively lighter than many other dips!
Now, not only does it shine at casual dinner parties, but it also makes for some impressive special occasions . imagine serving this at your next shindig as guests rave about the unique aioli flavors and creative dipping sauces you’ve concocted.
The best part? this aioli pairs beautifully with grilled meats and veggies, making it a go-to for those summer cookouts or even seasonal holiday feasts.
Let’s not forget how it stands out compared to similar recipes. many dips can end up being heavy or not flavorful enough.
But this one is bold and balanced thanks to that clever blend of sweet blue jam and zesty garlic! it’s truly a flavor explosion recipe you can’t miss trying.
As we shift gears to the ingredients you’ll need to create this masterpiece, gather your essentials and let’s dive into crafting your own delightfully blue jam garlic aioli .
You’re going to love how simple and rewarding this kitchen adventure can be!
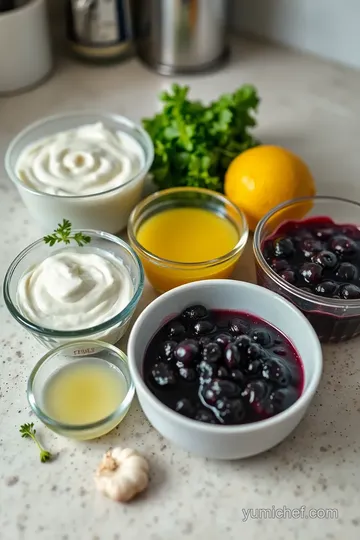
Essential Ingredients Guide: Elevate Your Culinary Game!
Let’s get down to business! cooking is always more fun when you have the right ingredients, so let’s break it down into simple steps.
Think of this as your go-to checklist for whipping up delicious dishes, from savory to sweet. trust me, once you start mixing things up in the kitchen, it’s a total game changer.
Premium Core Components
First off, let’s talk about measurements. you’ll want to keep it straightforward. for those of you rolling with the us system , cups and tablespoons will be your pals.
If you’re more into the metric system, grams and liters can help you level up your game. a good rule of thumb? use a kitchen scale for precision, especially when baking.
Now onto quality indicators. not all ingredients are created equal! fresh herbs should be vibrant and green; spices lose their punch over time, so check the expiration dates.
And hey, if that olive oil smells off, toss it! you don’t want stale oil ruining your dish.
Storage guidelines matter too. keep your herbs in the fridge for longevity, while oils do best in a cool, dark place.
Most dried spices last about 2-3 years, but you’ll know when they’re past their prime—just give them a sniff!
Signature Seasoning Blend
Ok, let’s spice things up! a little seasoning can be the difference between “eh” and “wow!” start with essential combinations and build from there.
Things like oregano and thyme are solid friends with pasta, while cumin and coriander are perfect for those taco nights.
For a flavor explosion, think about herb pairings. Basil pairs perfectly with tomatoes, and dill loves fish. A drizzle of a good balsamic vinegar can enhance those flavors, too.
Regional variations? oh, you bet! a touch of smoked paprika can transport you to southern bbq vibes. for something different, try adding five-spice powder for an asian twist.
But don’t be afraid to get creative and throw in your favorites!
Smart Substitutions
We’ve all been there—it's mid-recipe panic when you realize you're out of something crucial. it's cool! common alternatives can save your dish.
Got no heavy cream? greek yogurt can step in for that creamy goodness. if you’re feeling fancy, try using cashew cream for a vegan approach.
And let's talk about dietary needs. gluten-free? no problem! swap out your regular pasta for zucchini noodles or gluten-free grains.
Always have some quick and easy swaps in your back pocket for those times when you need a quick fix.
Kitchen Equipment Essentials
Let’s gear up! the right tools make all the difference. you don’t need a fancy shmancy kitchen, but must-have tools are essential.
A good chef’s knife and a sturdy cutting board can make prepping a breeze.
Think about your alternatives too. You don’t have a food processor? No worries! A good old-fashioned mortar and pestle will work just fine for grinding spices or making pestos.
Prep tips, oh man, that’s where efficiency lives! chop veggies ahead of time; it saves you from the hectic last-minute rush.
And don’t forget storage solutions—keep things organized! drawer dividers can turn chaos into neatness in no time.
Now, here's the big challenge: mixing blue jam garlic aioli delightfully . it's all about embracing the balance of flavors and getting that perfect texture.
With some basic kitchen skills, you'll be cruising through this delightful recipe.
Whether you're looking to create gourmet sauce recipes or just want to crank out a quick dip for your next gathering, this essential guide has your back.
Ready to dive into the instructions section ? let’s get our hands dirty and whip up that amazing delightfully blue jam garlic aioli! you won’t just wing it—you’ll ace it! cooking never tasted so good.
Elevate Your Dips with Blue Jam Garlic Aioli
Oh my gosh, if you’re looking to jazz up your culinary game, you’ve got to try mixing blue jam garlic aioli delightfully ! this isn’t just your average garlic aioli — it’s a smooth, creamy, sweet-and-savory dip that’ll have your taste buds dancing.
Seriously, every bite is a flavor explosion! let’s dive into how to whip this beauty up, shall we?
Essential Preparation Steps
Before you tackle this awesome blue jam aioli recipe , let’s chat about some essential prep.
- Mise en place: This fancy French term just means having everything ready before you start. So, get your ingredients measured and your tools lined up. Trust me, it'll save you from scrambling halfway through.
- Time Management: Set a timer when you’re mixing and cooling. This way, you can avoid that dreaded over-whisking moment.
- Organization Strategies: Keep your workspace tidy! This ain’t just about food; a clean area helps keep your mind clear.
- Safety Considerations: Remember to use fresh garlic and properly handle your egg yolk to avoid any funky bacteria. Cleanliness is key!
Step-by-Step Process
Now, let’s get to the heart of the matter. Here’s your step-by-step guide for making Delightfully Blue Jam Garlic Aioli .
- Prepare the Base: In a mixing bowl, whisk together 1 large egg yolk , 1 tablespoon Dijon mustard , and 1 tablespoon white wine vinegar .
- Emulsify: While whisking continuously, slowly drizzle in 1 cup neutral oil . Keep whisking until it thickens and looks dreamy. This is where you need to control that temperature! Aim for room temperature ingredients for the best emulsification.
- Add Garlic: Stir in 1 tablespoon minced garlic (like, 3-4 cloves). Mix until it’s all blended in.
- Incorporate Blue Jam: Now, gently fold in 1/3 cup blue jam . You want it mixed, but let some of that jammy goodness shine through.
- Season: Add salt and fresh black pepper to taste.
- Chill: Transfer to an airtight container and refrigerate for 30 minutes . The flavors meld during this time, and trust me, you’ll thank yourself later.
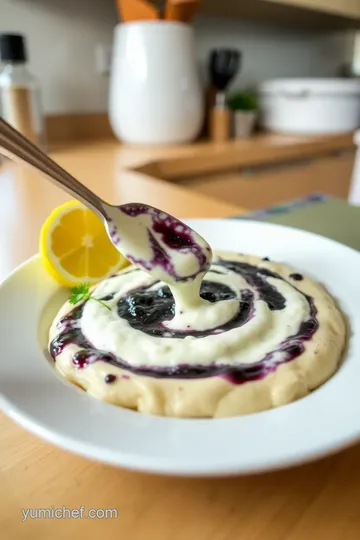
- Serve: It’s ready to wow your friends! Serve it cold as a dip or drizzle over grilled veggies or meats.
Expert Techniques
Honestly, emulsification can be tricky, but don’t sweat it — you’ll master it in no time! Here are some expert tips:
- Watch Your Oil: When you add the oil, drizzle slowly for the best emulsion.
- Quality Checkpoints: Look for a thick, creamy texture when whisking. If it’s too runny, you need to add more oil.
- Troubleshooting Tips: If your aioli breaks (sad face), add a teaspoon of water and whisk like there's no tomorrow! That usually fixes it.
Success Strategies
Finally, let’s make sure you nail this recipe. Here are some common mistakes to avoid:
- Don’t Rush: Perfect aioli takes patience!
- Quality Assurance: Always taste! Adjust the blue jam to find that heavenly balance of sweet and savory.
- Make-Ahead Options: This jam aioli actually gets better after sitting for a bit in the fridge. So, think ahead and make it a day before your gathering. You’ll impress everyone without breaking a sweat!
Closing Thoughts
By now, you’re ready to start a culinary adventure with this unique aioli. whether you’re dipping fresh veggies or slathering it on sandwiches, this sauce is bound to be a notable condiment.
Just remember: it all starts with fresh ingredients and a little love sprinkled in.
For more tips and tricks on flavorful spreads and unique sauces, stay tuned for our next section: Additional Information. Happy cooking, friends!
Pro Tips & Secrets to Elevate Your Aioli Game
Oh my gosh, who doesn’t love a fabulous homemade aioli ? it’s such a game changer, especially when you’re mixing flavors! so, let’s chat about some pro tips for making that delightfully blue jam garlic aioli really pop.
First things first, fresh ingredients are key. i mean, nobody wants a bland dip, right? when you’re choosing your garlic, get the freshest bulbs you can find.
Trust me, it makes a world of difference! also, take your time with the emulsification technique . drizzle that oil in slowly while whisking like you mean it.
This is where the magic happens!
And let’s not forget about seasoning. taste as you mix! you might want to adjust the amount of blue jam .
A little more jam if you’re feeling adventurous, or less if you fancy something more savory. this step is all about finding that perfect balance of flavors.
Perfect Presentation for a Showstopper
Let’s be honest: we all eat with our eyes first. So, when it comes to presentation , make sure your aioli looks as good as it tastes! Here’s the scoop:
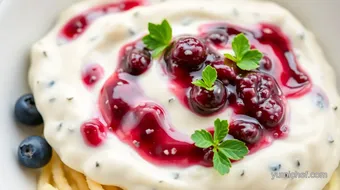
Use a shallow bowl to serve, and scoop that aioli into the center. with a spoon, create swirls or peaks on the surface for texture.
You can also drizzle a bit more blue jam on top for a pop of color. speaking of colors, remember that contrasting colors work like a charm.
Think vibrant veggie sticks or crispy bread against the deep hues of your aioli!
For garnishing, fresh herbs can work wonders. a sprinkle of chives or parsley not only adds a pop of green but also freshness.
You know, it’s the little things that impress folks at parties. “what’s in this?” they’ll ask, totally amazed.
Storage & Make-Ahead Strategies
Plan ahead, and this aioli will be your best friend! you can whip this up and store it in the fridge for about 3-5 days .
Just make sure it’s in an airtight container to maintain that freshness.
If you need to reheat it (though i love mine chilled), do it gently. don’t microwave it for too long; just a few seconds should do the trick to avoid a sad sauce.
I’ve made that mistake—trust me, it’s not cute.
Creative Variations to Explore
Now, you’ve made the basic blue jam aioli recipe , but why stop there? get creative! want a bit of zing? toss in some cayenne pepper or sriracha for a spicy kick.
Or change things up with seasonal jams like strawberry or peach for a fruity twist!
Thinking of dietary modifications? you can totally make this vegan! swap the egg yolk for aquafaba —that’s the liquid from a can of chickpeas, and it works wonders.
You can also play with textures by adding mashed avocado to your aioli. yum!
Complete Nutrition Guide for the Healthy Eaters
Let’s chat about the nutritional goodness in this delight. with healthy fats from the oil and all those bright, fresh flavors, this aioli isn’t just a treat but also packs a punch nutritionally! it offers about 120 calories per serving, which isn’t bad for a gourmet condiment.
If you're looking out for sugars, this aioli keeps it low, allowing you to flavor up your meals without guilt.
Remember though, like with anything, portion control is key. Pairing it with veggies keeps it light, but slathering it on all the things might turn your dipping sauce into a calorie bomb!
Expert FAQ Solutions for Common Concerns
Got questions about your aioli? you’re not alone! a common issue is the emulsification not working. if your oil separates from your mixture, try adding a tiny bit of water to stabilize it.
It sounds counterintuitive, but it can save your sauce!
If you wanna know how to mix flavors, remember: balance is everything! if your aioli is too sweet, a dash of lemon juice can brighten it up.
Experiment until you find what sings to your taste buds.
So, there you have it! whether you’re diving into the mixing of blue jam garlic aioli delightfully or exploring all the creative variations, cooking should be a joyful adventure.
Embrace the process, and don’t stress too much about perfection. enjoy every bite, and happy cooking!

Delightfully Blue Jam Garlic Aioli Recipe Card
⚖️ Ingredients:
- 1 large egg yolk (15 g)
- 1 tablespoon Dijon mustard (15 g)
- 1 tablespoon white wine vinegar (15 mL)
- 1 cup neutral oil (canola or grapeseed) (240 mL)
- 1 tablespoon minced garlic (3-4 cloves) (15 g)
- 1/3 cup blue jam (approximately 115 g)
- Salt and freshly cracked black pepper to taste
🥄 Instructions:
- Step 1: In a mixing bowl, combine egg yolk, Dijon mustard, and white wine vinegar.
- Step 2: Slowly drizzle in the neutral oil while whisking continuously until the mixture thickens.
- Step 3: Stir in minced garlic, mixing until evenly distributed.
- Step 4: Gently fold in the blue jam, ensuring it is well-blended but retains some of its fruit texture.
- Step 5: Season with salt and freshly cracked black pepper to taste.
- Step 6: Transfer to an airtight container and refrigerate for at least 30 minutes to allow flavors to meld.
- Step 7: Serve chilled as a dip or drizzling sauce.
Previous Recipe: How to Sear White Fish in Creamy Lemon Sauce: A Delicious Weeknight Dinner
Next Recipe: How to Bake Pear Kugel - Deliciously Dairy-Free: Ultimate Comfort Food!