Quick and Easy Food Processor Pannera Bread
Ever wondered how to make homemade bread effortlessly? My Quick and Easy Food Processor Pannera Bread offers bakery-style goodness in just a few steps! Try it today!

- Let’s Get Baking: The Perfect Introduction to Food Processor Pannera Bread
- Your Essential Ingredients Guide for Delicious Homemade Bread
- Make Homemade Magic with Food Processor Pannera Bread - Quick & Easy
- Pro Tips & Secrets to Up Your Bread Game
- Perfect Presentation: Make It Pop!
- Storage & Make-Ahead: Keeping It Fresh
- Creative Variations: Make It Yours
- Complete Nutrition Guide: Feel Good About Your Food
- Expert FAQ Solutions: You’re Not Alone!
- Conclusion: Get Baking!
- Recipe Card
Let’s Get Baking: The Perfect Introduction to Food Processor Pannera Bread
Have you ever had one of those days where you just crave freshly baked bread but cringe at the thought of the time and effort it usually takes? trust me, i’ve been there! one rainy afternoon, with nothing but a half-empty pantry and a serious craving for pannera-style bread , i decided it was time to whip up some magic.
That’s when i discovered my go-to recipe: food processor pannera bread - quick & easy . imagine warm, crusty bread right out of your oven, ready for slathering with butter or serving alongside the perfect soup.
Seriously, i had to share this experience!
What’s the Deal with Pannera Bread?
Diving into the history of this bread, it actually traces back to traditional european baking techniques, but with a modern american twist! originally, people would spend hours kneading and waiting for their dough to rise, but that’s where the genius of food processor recipes comes in.
With this no-knead bread , you get all the amazing flavors and textures—honestly, your kitchen will smell like a bakery—with a fraction of the fuss.
This loaf lets you embody your inner artisan baker without all the heavy lifting. plus, it's become a staple in homes everywhere because let's face it: everyone loves homemade bread!
Got about 10 minutes of spare time? that’s right, you can whip this up quickly, wait a couple of hours while it rises, and then voilà—bread! what’s even better? this recipe yields one hefty loaf, perfect for feeding the family or impressing friends.
Just a heads up, though, a little olive oil on that crust makes it sing!
Why You’ll Love This Recipe
Now, let's talk about the perks! first and foremost, health benefits . this bread is made with wholesome ingredients and you can control what goes in it.
Bye-bye preservatives! plus, you'll be treated to that airy bread texture that's absolutely delightful.
You know what's super cool? this recipe is a clever twist on a traditional yeast bread recipe . with minimal effort, you’ll get that rustic, hearty loaf that’s ready for spectacular sandwiches or simply toasting with a touch of jam.
And trust me, it’s perfect for all kinds of occasions, from cozy dinners to fancy brunches.
Want some special occasion ideas? think soup and bread recipes for those fall nights or a heartwarming gathering with friends.
This bread pairs beautifully with a minestrone or a rich tomato basil. i mean, can you even imagine?
Another kicker? this bread is so versatile. want to bake with herbs? go for it! it's like your bread, your rules, right? get adventurous: throw in some cheese or nuts for a nutty bread flavor, and you’ll wow your guests while professing how easy it was to bake.
Ready for the Ingredients?
Now that i’ve gotten you excited about this rustic bread recipe , it’s time to dive into what you’ll need to make this happen.
Trust me, you'll want to keep these items on hand because once you taste this bread, you'll be making it over and over again! so gather your essentials, roll up your sleeves, and let’s create some crusty homemade bread that’ll leave your kitchen smelling heavenly.
Get ready to embrace the art of simple bread making in a way you've never done before! i promise you, that freshly baked bread experience will completely change the game and make your taste buds dance.
Let’s get rolling!

Your Essential Ingredients Guide for Delicious Homemade Bread
When you're diving into the world of homemade bread , there’s a treasure trove of knowledge right at your fingertips.
You wanna make that airy bread texture you've been dreaming of? it’s all about knowing your core ingredients , those essential components that take your simple bread-making skills to bakery-level perfection.
Let’s get the deets!
Premium Core Components
First off, let’s talk about your premium ingredients . Sometimes, it’s all in what you use! Here’s a quick lowdown:
-
Measurements: for easy baking techniques , you’ll want to keep a kitchen scale handy . for our yeast bread recipe , you’ll need 4 cups (500g) of all-purpose flour.
If you’re counting in grams is tough, then rolling with us measurements is just as good.
-
Quality indicators: make sure your flour is fresh. it should look smooth and not have any weird clumps. when it comes to yeast, check the expiration date; active yeast is your bestie for that glorious rise.
-
Storage Guidelines: Keep your flour and dried ingredients in a cool, dry place to prolong shelf-life. And, did you know? storing your yeast in the fridge can help it stay fresh longer!
-
Freshness tips: always look for petals! what i mean is, when you open your yeast, it should smell yeasty and not funky.
For herbs, freshness is key—dry herbs should snap when you bend them.
Signature Seasoning Blend
Now, let’s sprinkle in some flavor! Your bread isn’t just a vessel; it’s a flavor-packed piece of heaven!
-
Essential Spice Combinations: You can’t go wrong with a pinch of salt. Seriously, it elevates everything!
-
Herb selections: cooking with yeast? an easy way to boost flavor is to add herbs directly into the dough. think rosemary, thyme, or even a bit of garlic powder .
Talk about delicious bread pairings !
-
Flavor Enhancers: A drizzle of olive oil in your bread dough? Yes, please! It creates a lovely olive oil bread crust and adds richness.
Smart Substitutions
So, recipe calls for something and you’re out? Chill, I got your back!
-
Common Alternatives: If you’re low on all-purpose flour, try using whole wheat flour ! Your rustic bread will have a nutty flavor that’s chef’s kiss .
-
Dietary Modifications: For vegans, replace honey with maple syrup. You can use apple sauce instead of sugar to zap a little extra moisture.
-
Emergency Replacements: No yeast? You can still pull off a quick bread recipe using baking powder or baking soda!
-
Seasonal Options: Love to play with seasons? Add pumpkin puree in those fall months or zucchini all summer long!
Kitchen Equipment Essentials
What about the tools of the trade? You don’t need fancy stuff, just the must-haves!
-
Must-Have Tools: For my adored Food Processor Pannera Bread - Quick & Easy , you’ll definitely want a food processor with a dough blade. Seriously, it cuts time in half!
-
Alternative Options: No food processor? No biggie! A mixing bowl and muscles could do the trick, too.
-
Preparation Tips: Utilize a kitchen towel to keep your dough cozy while it rises.
-
Storage Solutions: A bread box is a game-changer. It helps keep crusty homemade bread fresh without losing its charm.
As you dabble in these essentials, think of them as your trusty sidekicks on your journey to baking artisan bread at home ! everything you learn here amps up your bread game, turning simple recipes into something truly special.
Just insist on using the best ingredients and techniques, and you’ll be well on your way to baking up something fierce.
Now, grab your apron and let’s get to those step-by-step instructions that will make your kitchen smell like the best bakery in town!
Make Homemade Magic with Food Processor Pannera Bread - Quick & Easy
Have you ever walked into a bakery and just inhaled that heavenly, warm, fresh-baked bread smell? oh my gosh, it's like an embrace, right? well, today, i'm gonna help you recreate that magic with quick and easy food processor pannera bread .
It's basically a love letter to rustic bread-making, and the best part? you can whip it up in your own kitchen without breaking a sweat!
Essential Preparation Steps
So, let’s kick things off with mise en place . it sounds fancy, but it just means getting all your ingredients in order before you start.
Measure out your 4 cups of all-purpose flour , 1 ½ teaspoons instant yeast , 1 teaspoon salt , and 1 tablespoon sugar .
Warm up 1 ½ cups of water to about 110° f ( 43° c) —yes, that’s important! this is how we wake up the yeast!
Now, let’s talk time management . you want to set aside about 10 minutes for prep and about 2 hours for the dough to rise.
Yes, you read that right. make some coffee, binge-watch a show, or hit that tiktok scroll while it does its thing.
Use a kitchen towel or plastic wrap to cover your bowl for a cozy environment.
Organization strategies go a long way, too. keep your space tidy and ready to roll. and safety? don’t forget to mind those hot surfaces while you're preheating your oven to 450° f ( 232° c) .
Trust me, nobody wants a burnt finger!
Step-by-Step Process
Okay, here’s where the magic happens.
-
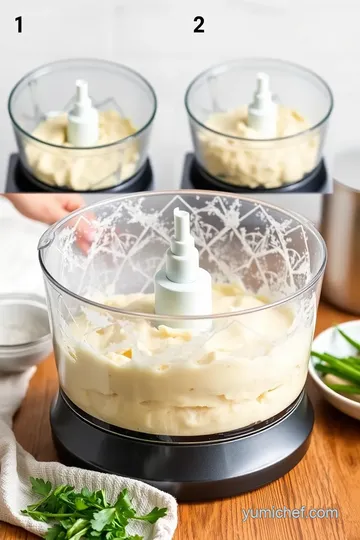
Prep the Food Processor : Attach that dough blade. So easy!
-
Combine Dry Ingredients : Toss your flour, yeast, salt, and sugar into that food processor like a champ. Pulse briefly to mix.
-
Add Wet Ingredients : While it’s running, pour in the warm water. You’ll see a shaggy dough forming - that’s a good sign.
-
Knead the Dough : Keep it going for about 1- 2 minutes . You want a smooth and slightly sticky dough - don’t overdo it.
-
First rise : throw that dough into a lightly greased bowl, cover it up, and let it rise for about 1- 2 hours until it doubles in size.
Perfect time for a snack!
-
Shape the Dough : Flour your surface, turn that dough out, and give it a few gentle folds. Shape it into a loaf that even your mom would be proud of .
-
Second Rise : Place that beauty in your baking sheet or loaf pan and let it rise again for 30- 60 minutes .
-
Bake it up : brush the top with a bit of olive oil for that gorgeous golden crust (optional). bake in your preheated oven for 25- 30 minutes .
It should sound hollow when tapped. that’s the magic sound!
-
Cool Down : Once out of the oven, set it on a wire rack to cool. Patience folks, waiting is key here!
Expert Techniques
Now let’s get a bit pro! One major tip? Quality checkpoints during each phase are crucial. You want that dough to really rise, so pay attention to feed it a warm environment.
If you’re struggling with the dough at any step, don’t sweat it! just remember that troubleshooting is part of the process.
If it feels too dry, sprinkle a bit of water. too wet? add flour carefully. you got this!
Success Strategies
Let’s wrap up with some common mistakes to avoid ! don’t skip that second rise. seriously, you could end up with a dense loaf instead of that airy bread texture we all love.
Also, measuring accurately is vital—too much flour can mess everything up!
Quality assurance? Keep an eye on that oven. Know your timer is on point, and trust those auditory clues.
Want to plan ahead? You can totally make this bread dough and pop it into the fridge for up to a day before shaping and baking. Perfect for busy weeknight dinners.
So there you have it; your ticket to luscious, homemade bread that rivals any artisan bakery—right from your cozy kitchen.
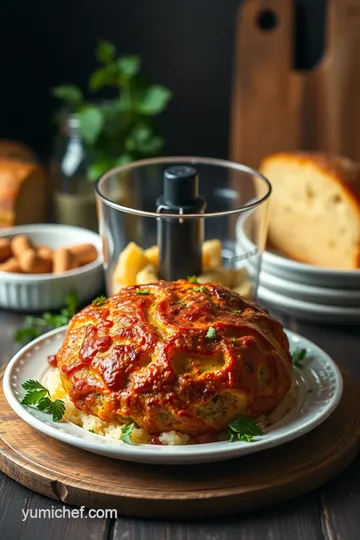
And by the way, this food processor pannera bread - quick & easy recipe is not just for show. slap on some avocado, whip up a hearty soup, and you’re dining like royalty!
Got any leftover bread? Try making some French toast or cheesy garlic bread. Your taste buds will thank you. Up next? We've got some extra tips and tricks to elevate your bread game, so stay tuned for Additional Information!
Pro Tips & Secrets to Up Your Bread Game
Let’s be real: baking bread is glorious, but it can be a bit intimidating, especially for those of us who were raised on bakery bread.
But guess what? making food processor pannera bread - quick & easy is a game-changer! here are some chef's personal insights i’ve gathered through trial and error (and maybe some flour fights).
When you're working with yeast , patience is key. find a warm spot in your kitchen, maybe near the oven as it’s preheating, for the dough to rise.
Trust me, this little tip makes a world of difference in achieving that airy bread texture . also, don’t rush the knead ; just a couple of minutes in the food processor is enough.
Too much handling can toughen it up!
For a quick flavor boost , consider tossing in herbs or spices. a little garlic powder or fresh rosemary? hello, gourmet bread! finally, brush it with olive oil before baking.
It gives that beautiful golden crust—like it just left the bakery, only better.
Perfect Presentation: Make It Pop!
Okay, let’s be honest. You eat with your eyes first. So, how do we make this rustic beauty really shine? Plating averages up to a whole new appreciation of your bread!
Color combinations are everything here. think about serving that golden-brown loaf with a vibrant salad or a rich bowl of tomato soup.
Adding a sprinkle of fresh herbs on top? chef's kiss! you’ll want to aim for a rustic presentation. use a wooden board for serving and pair it with a small bowl of olive oil for dipping.
Storage & Make-Ahead: Keeping It Fresh
So, you've baked this divine loaf, but now you’re scratching your head about what’s next. Here’s the scoop on storage and make-ahead techniques.
Homemade bread is best enjoyed fresh but can last about 3-5 days if stored properly. wrap it in a kitchen towel to keep that crust nice and crisp.
If you find yourself with leftovers (which is rare, let’s be honest), you can freeze slices for up to 3 months .
Just pop them in the toaster from frozen, and you’ll have that just-baked aroma in no time.
Creative Variations: Make It Yours
The beauty of food processor recipes is their adaptability. Feel free to get creative!
For a more nutty bread flavor , try adding some seeds like flaxseeds or sunflower seeds. if you’re feeling adventurous, you could even swap out some of the all-purpose flour for whole wheat.
Want a seasonal twist? how about pumpkin puree in the fall? seriously, the options are endless!
Complete Nutrition Guide: Feel Good About Your Food
Now, onto the serious stuff—nutrition. this homemade bread isn’t just delicious; it has plenty of benefits. each serving packs a punch with roughly 130 calories and 4g of protein .
Plus, you can ditch those pesky preservatives you’d find in store-bought bread.
For those mindful about what they eat, remember that you can control the ingredients. opt for healthier olive oil and skip the processed sugars.
So, picture this loaf as not just another piece of bread but a solid choice for sandwiches or a side to your favorite soup recipes.
Expert FAQ Solutions: You’re Not Alone!
Let’s tackle some common questions. “why isn’t my dough rising?” don’t sweat it! it could be a cool kitchen. try preheating your oven to the lowest setting and turn it off before placing your dough inside to rise.
And if you’re wondering about those baking bread tips , remember this: if it’s too sticky, add a little more flour but in moderation.
It’s all about finding that sweet spot for a perfect crusty homemade bread !
Conclusion: Get Baking!
Making food processor pannera bread - quick & easy is not just about the end result. it’s about the journey, the smells, and your friends hovering over the counter waiting for a slice.
Homemade bread is not just food; it's love baked into a loaf. don’t hesitate to experiment, because that’s where the magic happens.
Grab that food processor, roll up your sleeves, and let’s get this delightful loaf in the oven! happy baking, friends!
Quick and Easy Food Processor Pannera Bread Card
⚖️ Ingredients:
- 4 cups (500 g) all-purpose flour
- 1 ½ teaspoons (7 g) instant yeast
- 1 teaspoon (6 g) salt
- 1 tablespoon (12 g) sugar
- 1 ½ cups (360 ml) warm water (about 110°F/43°C)
- 1 tablespoon (15 ml) olive oil (optional, for a golden crust)
🥄 Instructions:
- Step 1: Attach the dough blade to your food processor.
- Step 2: In the food processor, combine flour, yeast, salt, and sugar. Pulse briefly to mix.
- Step 3: With the processor running, slowly pour in warm water until a shaggy dough forms.
- Step 4: Continue processing until the dough is smooth and slightly sticky, about 1-2 minutes.
- Step 5: Transfer the dough to a lightly greased bowl, cover with a towel, and let it rise in a warm place for about 1-2 hours until doubled in size.
- Step 6: Turn the dough out onto a floured surface; gently fold it a few times and shape it into a loaf.
- Step 7: Place the shaped loaf onto a baking sheet or into a loaf pan. Cover and let rise for 30-60 minutes.
- Step 8: Preheat the oven to 450°F (232°C). Optionally, brush the top with olive oil before placing in the oven.
- Step 9: Bake for 25-30 minutes until golden brown and sounds hollow when tapped.
- Step 10: Transfer the loaf to a wire rack and let it cool before slicing.
Previous Recipe: How to Bake a Bread Bowl - Soft & Delicious Recipe for Every Occasion!
Next Recipe: How to Bake Chocolate Lava Cake | Gooey & Delicious: My Favorite Recipe