Bake Vanilla Cake - Soft & Fluffy Delight
Craving something sweet? My grandma's soft and fluffy vanilla cake recipe is simple and satisfying. Bake Vanilla Cake - Soft & Fluffy Delight for your next celebration!

- The Sweet Escape: Bake Vanilla Cake - Soft & Fluffy Delight
- Essential Ingredients Guide for Your Vanilla Cake Adventure
- Mastering the Art of Baking: Essential Steps and Techniques
- Pro Tips & Secrets to Bake Vanilla Cake - Soft & Fluffy Delight
- Perfect Presentation: How to Make Your Cake Shine
- Storage & Make-Ahead Tips
- Creative Variations: Let’s Mix It Up
- Complete Nutrition Guide: What’s Inside?
- Expert FAQ Solutions: Your Baking Dilemmas Solved!
- Conclusion: Bake Your Dream Cake!
- Recipe Card
The Sweet Escape: Bake Vanilla Cake - Soft & Fluffy Delight
Oh my gosh, can i tell you a secret? when i think about my happiest memories in the kitchen, a soft fluffy cake is always at the center.
Picture this: i’m standing in my mom’s cozy kitchen, surrounded by the sweet smell of butter and sugar, while we whip up a vanilla cake recipe that feels like a warm hug.
There’s something so magical about baking a cake—it’s not just about the ingredients; it’s about the love and laughter baked right in.
So, if you’re ready for a delightful trip down memory lane, let’s dive into how to bake a vanilla cake that’s every bit as special as those moments.
A Taste of Tradition
The classic vanilla cake has been gracing tables for ages. it’s like that trusty friend who’s always there for you, whether it’s an anniversary or a tuesday afternoon.
This cake has roots that date back to when bakers first started using refined sugar and flour. today, it remains a superstar in the baking world—perfect for birthdays and lunchboxes alike!
Now, don’t let the thought of baking scare you. this recipe is an easy vanilla cake that’s friendly to beginners and experienced bakers alike.
You’ll spend about 45 minutes from start to finish— 15 minutes to prep and 30 minutes in the oven.
Plus, it yields 8 servings , so you’ll have plenty to share—or not! your call!
Why You’ll Love This Recipe
Let’s talk benefits, shall we? this cake isn’t just a pretty face. it’s packed with goodness! the combination of egg and milk gives it a boost of nutrition, while the unsalted butter adds that rich flavor we all adore.
You can make it even healthier by using a gluten-free vanilla cake recipe ! who knew that a simple cake could cater to so many dietary needs?
This cake is perfect for special occasions. got a birthday coming up? or maybe a casual get-together? this vanilla cake for special occasions can be dressed up with colorful sprinkles or a drizzle of whipped cream topping for that extra flair.
Trust me—everyone will rave about it!
Advantages and Alternatives
What’s unique about this soft cake recipe ? well, it’s the texture! this cake is light and airy —the kind that just melts in your mouth.
Plus, it stands out against those dense, heavy cakes that can weigh you down. this is your go-to for when you need something impressive yet uncomplicated!
Feeling adventurous? you can switch it up with some vanilla cake variations ! throw in some almond extract in baking for a nutty twist or swap your milk for almond or oat milk for a dairy-free option.
The sky's the limit here!
As you make your way to mix those fluffy cake ingredients , remember that these little twists can keep your baking game strong and full of surprises.
It’ll give every occasion that extra oomph, and honestly, who doesn't love a good surprise?
Let’s Get to Baking!
So, before we dive into the nitty-gritty of ingredients, here’s a quick tip: make sure all your ingredients are at room temperature .
This helps everything blend better, creating that cake texture we crave—light yet satisfying! and trust me on this—give your cake enough time to cool before you frost it.
You want to avoid a melty mess on your hands—yikes!
Alright, grab your mixing bowls and let’s get ready to whip up some cake magic! Next up, we’ll gather our fluffy cake ingredients so we can kick off this baking adventure.
Essential Ingredients Guide for Your Vanilla Cake Adventure
Alright, friends, let’s dive into the wonderful world of ingredients! if you’re about to bake vanilla cake - soft & fluffy delight , knowing your ingredients can make or break your baking experience.
Trust me, i’ve had my share of “oh no, what did i do?” moments in the kitchen. so, let's get it right from the start!
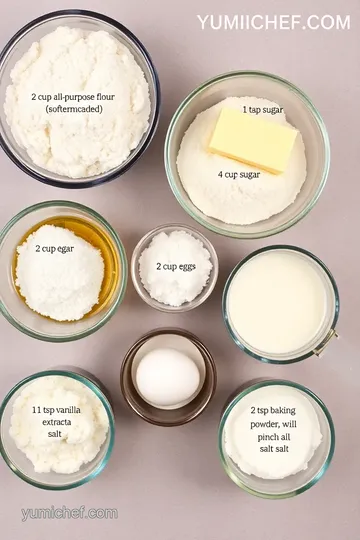
Premium Core Components
First things first, let’s get down to the nitty-gritty with some detailed measurements . you’ll need 2 cups (240g) of all-purpose flour, 1 ½ cups (300g) of granulated sugar, and ½ cup (113g) of unsalted butter to kick things off.
If you’re measuring in metric, yeah, it’s kind of a pain sometimes, but it’s worth it! so, what about storage? here’s a tip: keep your flour in an airtight container to prevent it from going rancid.
Ideally, your pantry should be cool and dry, so it lasts up to six months .
Ever see someone pick ripe cherries versus hard ones? Same deal with selection for your baking ingredients! While shopping, look for butter that’s smooth and soft, and make sure your eggs are fresh—check the date because nobody wants a surprise omelet!
Signature Seasoning Blend
Let’s jazz things up a bit with some essential spice combinations . for our vanilla cake, fancy yourself some pure vanilla extract (about 1 teaspoon ).
You can even mix things up by adding a hint of almond extract. it gives a lovely depth!
Though vanilla is the star of the show , herbs may not be your first thought, but feel free to experiment.
I've tried lavender before and, oh boy, it was an adventure! if you’re feeling wild, go for a lemon zest kick—it’s such a fresh flavor boost.
Smart Substitutions
Life happens, and sometimes you just don’t have everything on hand. here’s where smart substitutions come to the rescue! if you’re out of butter , no sweat—use coconut oil.
In a pinch for a light cake texture ? applesauce can be swapped in. for folks keeping an eye on gluten, check out a gluten-free vanilla cake recipe with a good blend of almond and buckwheat flour.
Dietary modifications are super helpful, too. want to switch it up for a dairy-free vibe? almond milk or oat milk works like a charm.
Keep those options in your back pocket, like a trusty sidekick!
Kitchen Equipment Essentials
You’ve gathered the ingredients, but hold up, don’t forget the must-have tools ! you’ll want some mixing bowls , an electric mixer or good old-fashioned whisk if you’re feeling strong.
And please—do yourself a favor and get 2 (9-inch) round cake pans . trust me, it’s a game changer for even baking.
Here’s a tip: prepping your equipment beforehand can save you a lot of grief—like losing track of time while chasing down a stubborn spatula. Keep everything handy!
Wrapping It Up
So, now that you’ve got the scoop on your core ingredients, signature blends, smart swaps, and must-have tools, you’re feeling pretty ready to tackle your cake baking techniques .
I mean, can you just picture it? the aroma wafting through your kitchen as you whip that batter into fluffiness? it’s a magical experience.
With some baking tips for beginners and understanding your ingredients fully, you’re on your way to creating that soft fluffy cake that will have everyone asking for seconds.
And don’t forget those cooling tips—let that cake sit for a bit before you start decorating!
Stay tuned because we’re just getting into the good stuff. Next up, I’ll walk you through the step-by-step instructions to turn your delicious ingredients into an unforgettable vanilla cake experience! Let’s get baking!
Mastering the Art of Baking: Essential Steps and Techniques
Bake vanilla cake - soft & fluffy delight is one of those recipes that just keeps you coming back for more.
It’s like the classic comfort food of the dessert world. whether you're throwing a birthday bash or just enjoying a slice on a quiet afternoon, this cake is sure to impress.
Let’s dive into some professional cooking methods that’ll help you nail that soft, fluffy texture and rich flavor.
Essential Preparation Steps
First things first, let’s talk mise en place . this fancy french term simply means “everything in its place.” before you even preheat that oven, gather all your ingredients.
Measure out the 2 cups of flour , 1 ½ cups of sugar , and the rest of those hero ingredients.
It’ll make the process so much smoother.
Now onto time management . baking can feel chaotic if you don’t plan it out. set a timer for each part: 15 minutes for prep and a good 30 minutes for baking .
This way, you can relax while your cake does its thing.
Don't forget about organization strategies . keep your bowls and utensils nearby. maybe designate a “cake zone.” this will prevent you from running around looking for that measuring cup or spatula when you need it.
And hey, here’s some safety consideration wisdom: keep a clean kitchen space. always wipe spills. you don’t want to go sliding across the floor like a contestant on a cooking game show!
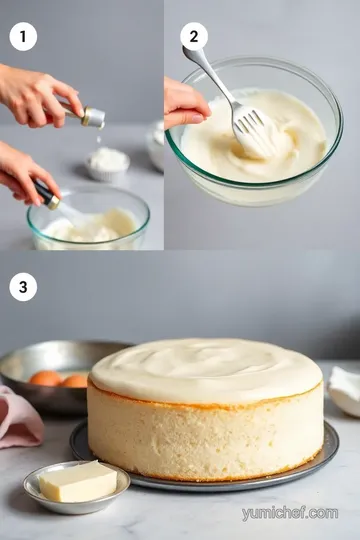
Step-by-Step Process
Alright! We’re rolling now. Here’s how to get this vanilla cake in the oven:
-
Preheat your oven to 350° F ( 175° C) . This can’t be stressed enough – an oven that’s not hot will mess with your cake's rise.
-
Prepare those cake pans. Grease them up and line them with parchment paper. Trust me, this will save you from a cake catastrophe later.
-
Mix the dry ingredients in one bowl. Whisk together the flour, baking powder, and salt. It’s like giving your cake the support it needs to rise beautifully.
-
Cream butter and sugar until fluffy. use an electric mixer on medium speed. this is where the magic happens. it should take about 3- 5 minutes .
Aim for that light and airy texture that makes you think, “yes, this is going to be good.”
-
Add your eggs one by one , giving them a good mix after each addition. And don’t skimp on the vanilla! It’s a game-changer.
-
Combine your mixtures . start with those dry ingredients and alternate with the 1 cup of milk . mix just until it’s combined; no need to get overzealous.
Overmixing is a rookie mistake that will rob you of that light and airy cake you crave.
-
Divide the batter evenly and pour it into the prepared pans.
-
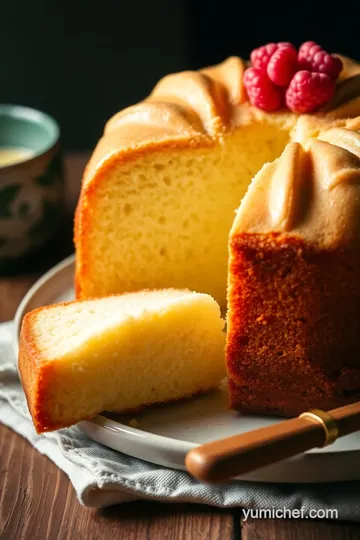
Bake for 25- 30 minutes . A toothpick should come out clean. Pro tip: if you hear a ‘thump’ when you take the cake out, it’s perfect!
-
Lastly, let it cool for about 10 minutes in the pans before transferring to a wire rack to cool completely. This is crucial to avoid a soggy mess!
Expert Techniques
So you want to elevate your cake? let’s talk quality checkpoints . when creaming that butter and sugar, look for a texture that’s almost fluffy like whipped cream.
If it feels dense or grainy, whip it longer.
Now, let’s hit a little troubleshooting . if your cake sinks, it may not have had enough heat. make sure you’re using an oven thermometer .
Some ovens lie and can read wrong!
Success Strategies
Here’s where you level up. Common mistakes include not using room temperature ingredients or forgetting to sift your flour. Those can lead to dense disasters!
Looking for quality assurance tips ? Always trust your senses. Smell, color, texture - if it looks golden, smells heavenly, and feels springy, you’re on the right track.
Lastly, make-ahead options are a lifesaver. Consider prepping batter and storing it in the fridge overnight. Just bring it to room temperature before baking.
So, there you have it! with these professional cooking methods, you’re well on your way to creating a homemade vanilla cake that’s everything you dream of.
If you’re excited about mastering this, stick around for our next segment on crafting the perfect whipped cream topping to go along with your soft, fluffy cake!
Pro Tips & Secrets to Bake Vanilla Cake - Soft & Fluffy Delight
Alright, friends! let’s dive into the secret sauce that takes your vanilla cake recipe from good to oh-my-gosh amazing! you know, when i first started baking, i was a hot mess with flour everywhere.
But these tips? they saved my baking game!
Creaming butter and sugar: this is key! you wanna cream that butter and sugar until it’s light and fluffy. the fluffy cake ingredients need air to rise, ya know? think of it like whipping up a cloud.
Room temperature ingredients: make sure your eggs, milk, and butter are at room temp. this is super crucial. it helps everything mix well and gives you that soft fluffy cake texture we all dream about.
Don’t Overmix: Once you add the dry ingredients, use a gentle hand. Overmixing is a quick way to get a dense cake. Just fold until combined, okay?
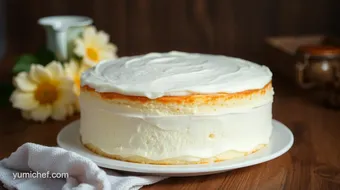
Perfect Presentation: How to Make Your Cake Shine
Presentation matters, folks! We eat with our eyes first, right? So here’s how to make your cake look like it came from a fancy bakery.
Plating Techniques: Use a cake stand for a classy touch. It elevates your dessert (pun intended) and makes it the star of the show.
Garnish Ideas: Fresh berries on top or a sprinkle of powdered sugar will wow your guests. And don’t forget a drizzle of whipped cream topping for that extra indulgence!
Color Combinations: A slice of light and airy cake next to some fresh fruit is visually stunning. Think about contrasts—light cake with dark berries is a home run.
Storage & Make-Ahead Tips
Now, let’s talk storage. If you can’t finish that whole homemade vanilla cake , don’t stress!
Storage Guidelines: Keep your cake covered at room temperature for about 2-3 days. For longer freshness, pop it in the fridge in an airtight container.
Reheating Instructions: If you wanna enjoy that cake warm, a quick 10-15 seconds in the microwave does the trick. Just be careful not to dry it out!
Freshness Duration: Ideally, consume your cake within 4-5 days. But honestly, it’s so good, you might not even get that far!
Creative Variations: Let’s Mix It Up
Feeling adventurous? Let’s transform our classic vanilla cake with some fun twists!
Flavor Adaptations: You can up the flavor game by adding a teaspoon of almond extract. It takes that best vanilla cake flavors to the next level!
Seasonal Twists: Change it up for fall by adding some pumpkin spice, or for summer, how about a citrus zest for a lemonade-inspired treat?
Complete Nutrition Guide: What’s Inside?
You might be wondering, what’s the deal with the moist cake recipe ? Here’s a little breakdown to keep it real.
This vanilla cake for special occasions packs a punch with around 260 calories per slice . Not too shabby for a dessert, right? Just remember, moderation is key!
Health Benefits: Some health benefits? Protein from the eggs, calcium from the milk. So, we’re basically health-conscious here!
Expert FAQ Solutions: Your Baking Dilemmas Solved!
Ever been left scratching your head mid-recipe? Here’s a round-up of the most common baking questions I get.
Common Questions: "Why is my cake dense?" If it’s heavy, it’s probably overmixed. Always be gentle with your batter!
Success Tips: Always check your oven temperature for baking . Ovens can be tricky!
Conclusion: Bake Your Dream Cake!
So there you have it, my friends! from simple cake recipes to dazzling ideas for successful baking, you’re now armed and ready to bake vanilla cake - soft & fluffy delight .
Don’t shy away from giving it a shot for your next family gathering or just a lazy sunday treat. trust me, when they dig that fork in and take that first bite, you’ll be showered with compliments (and love!).
Now go on, grab those baking pans, and get to work! Happy baking!
Bake Vanilla Cake - Soft & Fluffy Delight Card
⚖️ Ingredients:
- 2 cups (240g) all-purpose flour
- 1 ½ cups (300g) granulated sugar
- ½ cup (113g) unsalted butter, softened
- 1 cup (240ml) whole milk, at room temperature
- 3 large eggs, at room temperature
- 2 ½ teaspoons baking powder
- 1 teaspoon pure vanilla extract
- ½ teaspoon salt
🥄 Instructions:
- Step 1: Preheat your oven to 350°F (175°C).
- Step 2: Grease the pans and line the bottoms with parchment paper.
- Step 3: In a medium bowl, whisk together flour, baking powder, and salt. Set aside.
- Step 4: In a large mixing bowl, cream the softened butter and granulated sugar until light and fluffy.
- Step 5: Add eggs one at a time, mixing well after each addition, then stir in vanilla extract.
- Step 6: Gradually add the dry ingredients to the wet mixture, alternating with the milk, starting and ending with flour.
- Step 7: Divide the batter evenly between the two prepared pans.
- Step 8: Bake in the preheated oven for 25-30 minutes or until golden brown and a toothpick inserted comes out clean.
- Step 9: Let the cakes cool in the pans for 10 minutes before transferring to a wire rack to cool completely.
Previous Recipe: How to Bake Chocolate Cake: Moist & Easy Treat for Everyone
Next Recipe: Easy Grilled Chicken Skewers with Sweet Honey: My Family's Favorite!