Easy Panera-Style Sourdough Bread Recipe
Want to learn how to bake sourdough bread like Panera? This easy recipe delivers a crusty loaf with a soft interior that’s simply irresistible! Get baking!

Bake Sourdough Bread: Easy Panera-Style Loaf
A Slice of Memory
Oh man, let me take you back a bit. picture me, a teenager, getting my first job at a local café.
You know, the kind of place where the sweet aroma of freshly baked bread hits you the moment you walk in? i’ll never forget the first time i tasted a warm slice of crusty sourdough bread.
The crispy crust shattered as i sunk my teeth into that soft interior—pure bliss! that experience sparked my passion for sourdough baking, and that's why i'm super excited to share this recipe with you.
Today, we’re diving deep into how to bake sourdough bread: easy panera-style loaf and trust me, it’s easier than you might think!
Discovering the Loaf
Sourdough has a rich history. it dates back thousands of years, with evidence found in ancient egypt! fast forward to today and, wow, it’s everywhere! bakeries are jumping on the sourdough train, and let’s not even talk about instagram—it's a fan favorite.
This easy sourdough recipe takes a bit of time but don’t worry! it’s mostly hands-off. prepare to set aside around 5- 12 hours.
Yep, that's fermentation at play! you can chill while the magic happens. and guess what? this recipe yields one giant loaf —enough to share during family dinners or hoard for late-night snacks (guilty!).
You might be wondering about costs; don't fret! you can whip up this beauty for peanuts. the ingredients are simple and easy to find, making it a great way to enjoy homemade sourdough bread without breaking the bank.
Why You’ll Love It
Now, let’s talk benefits. first off, sourdough bread is packed with health perks. its fermentation process makes it easier to digest and gives it that delightful tang.
Plus, it’s a great source of probiotics, which are amazing for gut health. you could say it’s a healthy bread option that’s downright delicious!
Let's get festive! this loaf is perfect for special occasions . whether it’s a cozy night with a movie or a holiday dinner, serving this bread will elevate any meal.
You can pair it with everything—soups, salads, or just a giant slather of butter. honestly, it works every time!
This panera-style loaf stands out from other bread recipes too. it’s crusty on the outside and soft on the inside, striking that perfect balance that makes artisan sourdough bread so appealing.
Not to mention, you can easily customize it with herbs, spices, or even your favorite cheeses! there’s something for everyone, making it a unique addition to any gathering.
Ready to Get Started?
Before you dive in, make sure your sourdough starter is bubbly and happy—that’s key! if you’re new to this, don’t sweat the small stuff; i’ve found that sourdough troubleshooting usually leads to delicious experiments.
Grab your favorite baking tools and let’s get ready to mix up some memories and enjoy the incredible journey of baking bread at home .
Now, let’s take a look at the ingredients you’ll need to create this tempting loaf. Trust me, after you take your first bite, you'll be glad you did!
The Ultimate Guide to Essential Ingredients for Baking Sourdough
When you’re about to embark on the journey of baking sourdough, having the right ingredients makes all the difference. especially if you're planning to bake sourdough bread: easy panera-style loaf , you want to make sure your pantry is stocked with premium core components .
Premium Core Components: What You Need
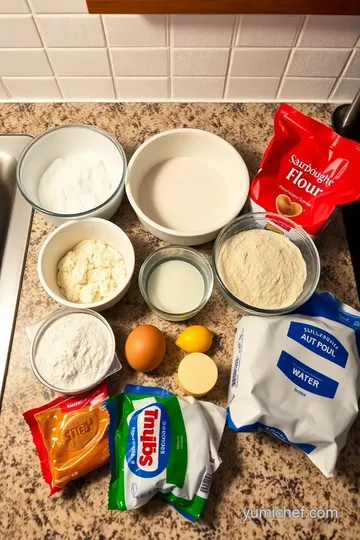
You’ll need to measure out your ingredients accurately. for this crusty bread recipe, you’re looking at 3 cups (360g) of all-purpose flour, 1 cup (240ml) of warm water, and about ½ cup (120g) of active sourdough starter.
A sprinkle of 1 ½ teaspoons (9g) of sea salt will add just the right amount of flavor.
When choosing flour, go for something high-quality. an excellent indicator of quality is how it feels when you rub it between your fingers.
If it’s smooth and fine, you’re good to go. store your flour in an airtight container in a cool, dry place to keep it fresh.
If you see any signs of bugs or off odors, toss it. better safe than sorry!
Signature Seasoning Blend: Spice It Up
Now, let’s talk seasonings! when making sourdough, the options are endless. you can add herbs like rosemary or thyme for a twist.
Heck, a little garlic powder wouldn’t hurt either. pairings like this can elevate your homemade sourdough bread from basic to extraordinary.
Use what you have, but if you want to keep it classic, salt is all you really need.
Smart Substitutions: Don’t Sweat It
Sometimes you may run out of that perfect ingredient—no problem! if you find yourself short on flour, you can substitute with bread flour for a chewier texture.
Don't have a starter? a good store-bought option can work wonders too. just make sure it’s active and bubbly. also, if someone in your house is gluten-free, swap in a gluten-free flour blend and add a binding agent like xanthan gum for best results.
Kitchen Equipment Essentials: Tools of the Trade
Baking sourdough does require some must-have tools. you’ll definitely need a large mixing bowl and a sturdy wooden spoon or dough scraper.
A kitchen scale might be a good idea for those precise measurements. if you really want that bread to shine, look into getting a baking stone or a heavy baking sheet.
And don't forget about parchment paper and a sharp knife for scoring the dough.
Preparing and Storing Your Bread
Once your bread is ready to cool, don't just toss it on the counter! instead, let it cool on a wire rack to prevent sogginess.
The crusty bread recipe really requires that perfect oven spring , so keep it airy! if you're not planning on eating it within a couple of days, wrap it up tightly and pop it in the freezer.
When you're ready to enjoy, just let it thaw at room temperature.
Conclusion: Get Ready for the Fun Part!
Now that you’re equipped with all the essential ingredients and tips to make your easy sourdough recipe , you're well on your way to baking success! each step in this process is as rewarding as it is tasty.
Ready to dive into the instructions? let’s get that bread baking! because honestly, is there anything better than the smell of artisan sourdough bread wafting through your kitchen? let’s take a step-by-step approach and make some delicious memories!
Mastering the Art of Professional Cooking: Your Guide to Bake Sourdough Bread: Easy Panera-Style Loaf
Cooking is an awesome art, right? it’s where science meets creativity and so much yumminess happens. when diving into professional cooking methods , one essential skill to master is bread baking – particularly, sourdough .
Seriously, who wouldn't want to bake their own delicious easy sourdough recipe at home? let's get into some essential preparation steps that can elevate your sourdough game to that beloved panera-level.
Essential Preparation Steps
Okay, first things first: mise en place . sounds fancy, huh? but all it really means is having everything ready before you start.
Measure out your 3 cups of flour, grab your ½ cup sourdough starter, and mix it all up. trust me, when you're in the groove of baking, having everything laid out equals less panic – and more awesome bread!
Time management is also key. give yourself at least 4- 12 hours of fermentation time. it feels like a waiting game, but that’s where the magic happens! instead of sitting around twiddling your thumbs, plan some snacks or catch up on your favorite show.
It makes those hours fly by.
Staying organized is a lifesaver. use bowls for your ingredients, and have your baking tools handy. for safety, make sure your workspace is clean, and keep your sharp knife close for scoring but out of the reach of little hands.
Always better to be safe!
Step-by-Step Process
Now that we’re prepped, let’s dive into the baking process. Here’s a clear step-by-step guide.
-
Combine Water and Starter : In a large bowl, mix 1 cup warm water with your ½ cup sourdough starter.
-
Incorporate Dry Ingredients : Whisk in the 3 cups of flour and 1 ½ teaspoons of sea salt until a rough dough forms.
-
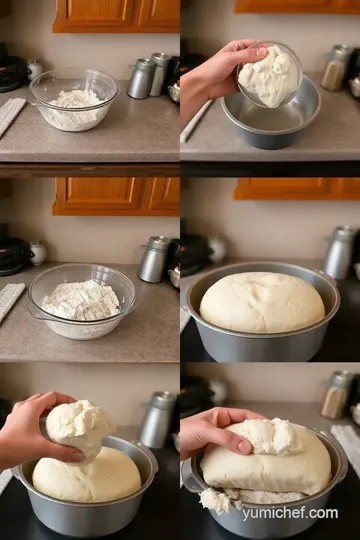
Knead Away : Spend about 5- 10 minutes kneading that dough until it’s smooth.
-
Bulk Fermentation : Pop your dough into a lightly oiled bowl, cover it, and let it rise in a warm spot for 4- 12 hours .
-
Shape It Up : After it’s risen and looks more puffy, turn it out onto a floured surface and form a nice round loaf.
-
Final Proof : Let it rest for 1- 2 hours . Use a cloth to keep it cozy!
-
Preheat Time : Preheat your oven to 450° F ( 230° C) . Get that baking stone or heavy baking sheet ready.
-
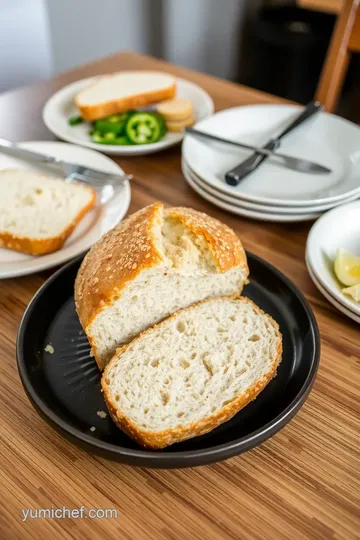
Score and Bake : Transfer your dough to parchment paper, score the top, and slide it on into the oven. Bake for 30 minutes .
-
Cool It Down : This part’s crucial. Let it cool for 30 minutes on a wire rack before slicing to keep the texture just right.
Expert Techniques
Listen, baking bread isn’t just about sticking ingredients together; it’s art. for the perfect results , check the sourdough bread hydration levels —aim for about 75%.
If your dough feels too dry, you can add more water. pro tip: keep an eye on the oven spring ! that’s when your loaf rises while baking.
It’s a magical sight.
Quality checkpoints? check if the crust is lovely and golden. the bread should sound hollow when tapped on the bottom — that’s how you know it’s done! and for troubleshooting, if your bread isn’t rising, your sourdough starter might be lazy.
Give it some tlc – feed it and store it properly.
Success Strategies
Now, let’s avoid some common pitfalls. over-kneading is a biggie; you want to develop gluten, but don’t go overboard! also, patience – i can’t stress that enough.
Rushing through fermentation times will take away from that deliciously tangy flavor.
Finally, you can make this ahead of time. just store the shaped loaf in the fridge for overnight proofing, which gives it an even deeper flavor.
Who knew baking could be so forgiving?
Baking your sourdough bread is not just a cooking process; it’s a whole mood . so, whether you’re tackling a rustic loaf or creating a classic sourdough bread , remember these tips.
You might just end up with a beautiful, delicious homemade loaf worthy of a bakery display case.
And there you have it! you’re well on your way to mastering homemade sourdough bread baking. but wait! there’s more to explore in baking, and that’s what we’ll cover next.
Let’s chat about more insights and resources for your sourdough journey!
Bake Sourdough Bread: Easy Panera-Style Loaf
Hey there, fellow bread lovers! if you're in the mood to bake something that’ll have your kitchen smelling like a cozy bakery, you’ve come to the right place.
Let’s dive into how to bake sourdough bread: easy panera-style loaf ! this crusty bread is earthy, tangy, and oh-so-satisfying.
It’s the kind of loaf you’ll want to show off at the dinner table or keep all to yourself while binge-watching your favorite show.
Pro Tips & Secrets
First things first, let’s talk sourdough baking tips ! using an active and bubbly sourdough starter makes all the difference.
Trust me! if your starter isn't at its prime, your loaf might end up sad and flat. a few hours of good sourdough bread fermentation can give it that delightful tang we all love.
Now, if you’re short on time (who isn’t?), i’ve got a time-saving technique for you. consider doing a longer bulk fermentation overnight.
Just let it sit in the fridge, and in the morning, you'll wake up to dough ready to be shaped! it’s like waking up to a gift.
For some flavor enhancement , try mixing in a spoonful of honey or a tablespoon of olive oil for richness.
Also, don’t be afraid to experiment with herbs or garlic powder. honestly, there are so many flavorful sourdough variations waiting to be discovered!
Perfect Presentation
Now, onto the fun part— perfect presentation! nothing beats a beautiful loaf of bread sitting on your kitchen counter. when you're ready to bake, consider using a baking stone .
It helps with that all-important crust. but if you don’t have one, no worries—just grab a heavy baking sheet.
When it comes time to shape sourdough , make sure you’re gentle. you want to maintain those lovely air pockets inside.
And when it comes to scoring (those fancy cuts on top), go for a zig-zag pattern; it’s stylish and helps with the oven spring in bread .
Lastly, don’t skimp on the garnishes! A sprinkle of coarse sea salt on top before baking adds a lovely finish. The result? An eye-catching and mouthwatering loaf that’s hard to resist!
Storage & Make-Ahead
Let's be real here: you probably won’t have leftovers, but in case you do, here’s how to store your crusty bread.
Keep it in a bread bag or a loosely covered container at room temperature for up to 3 days . if you want to preserve it longer, slice it and pop it in the freezer—just make sure to wrap it tightly!
Reheating is a breeze too. just throw it in a 350° f oven for about 10- 15 minutes. this brings that crispy crust back to life! and trust me, there’s nothin’ like freshly heated homemade sourdough bread.
Creative Variations
Now, if you’re feeling adventurous, how about trying some creative variations ? you could throw in some alternative flours like whole wheat or rye.
Each one gives a unique flavor profile. or, season it with spices that fit the season—think dried cranberries and walnuts in fall or zesty lemon and dill in spring!
Not to mention, if you have dietary considerations, swap the flour for a gluten-free blend, and just make sure to add a binding agent to help it hold together.
These tweaks make baking bread at home even more fun and inclusive for everyone.
Complete Nutrition Guide
Alright, let’s not forget about the nutrition! this bread is not just tasty; it's packed with benefits. sourdough has lower sourdough hydration levels , making it easier to digest than regular bread.
Plus, it’s full of probiotics, which are great for gut health.
A slice holds around 120 calories , making it a healthy option when compared to store-bought varieties. and don’t forget, you can pile on toppings like avocado or turkey to create a wholesome meal.
Expert FAQ Solutions
I know I’ve thrown a lot at you, but let’s tackle some common FAQs.
What if my bread doesn’t rise? Don’t panic! It’s likely your starter wasn’t active enough. Remember, keeping your starter happy and properly fed is key to successful sourdough bread rising times .
Got leftovers? How to store sourdough bread? Just wrap it in a paper bag or towel—stay away from plastic to keep that crust crispy!
Conclusion
So there you have it! baking your own easy panera-style sourdough loaf is not just gratifying; it’s also a fun way to impress your friends—and yourself! remember to give yourself some grace as you learn; every loaf is a chance to grow.
Now, grab your ingredients and get your bake on! you won’t regret it. happy baking!
Easy Panera-Style Sourdough Bread Recipe Card
⚖️ Ingredients:
- 3 cups all-purpose flour (360g)
- 1 cup warm water (240ml)
- ½ cup sourdough starter, active and bubbly (120g)
- 1 ½ teaspoons sea salt (9g)
- 1 tablespoon sugar or honey (optional)
🥄 Instructions:
- Step 1: In a large bowl, combine the warm water and sourdough starter. Whisk well.
- Step 2: Slowly add the flour and salt (and sugar/honey if using). Stir until a rough dough forms.
- Step 3: Knead the dough for about 5-10 minutes on a lightly floured surface until smooth and elastic.
- Step 4: Place the dough in a lightly oiled bowl, cover with a damp cloth, and let it rise in a warm spot for 4-12 hours, until doubled in size.
- Step 5: After the bulk fermentation, turn the dough onto a floured surface. Gently shape into a tight round loaf.
- Step 6: Let it rest on a floured surface for 1-2 hours, covered with a cloth or in a proofing basket.
- Step 7: Preheat the oven to 450°F (230°C). Place a baking stone or heavy baking sheet in the oven to heat up.
- Step 8: Carefully transfer the dough onto parchment paper. Use a sharp knife to score the top.
- Step 9: Slide the loaf onto the hot baking stone/sheet and bake for 30 minutes until golden brown.
- Step 10: Remove from the oven and let cool on a wire rack for at least 30 minutes before slicing.
Previous Recipe: How to Bake Chocolate Chip Cookies: Chewy & Delicious Family Treat
Next Recipe: How to Make the Best Sautéed Tomato Bisque with Creamy Flavor