Bake Koogle Pear Cake - Deliciously Dairy-Free
Wondering what to bake for dessert? Try my Bake Koogle Pear Cake - Deliciously Dairy-Free! It's moist, flavorful, and simply irresistible with ripe pears.

Oh my gosh, you guys! let me tell you about that magical moment when my grandma handed me her prized koogle pear cake recipe.
Her eyes sparkled as she told me about the family gatherings where this cake was the star of the show.
I couldn't wait to sink my teeth into that flavorful cake. but here's the kicker: i wanted it to be deliciously dairy-free ! and that’s how the adventure began with my bake koogle pear cake - deliciously dairy-free .
Now, i know you’re probably wondering, “why should i care about this cake?” well, this isn’t just any cake! this recipe has its roots in traditional eastern european desserts.
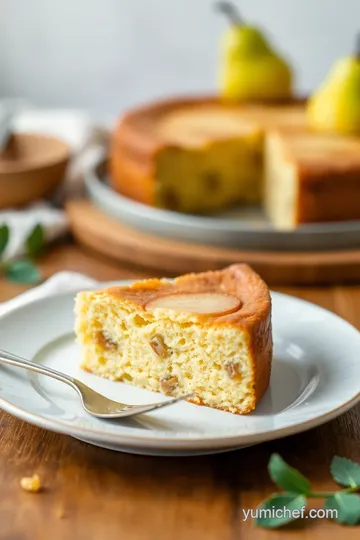
It’s packed with moistness from fresh pears and hints of warm cinnamon that just scream cozy evenings. seriously, every bite reminds me of autumn, which is just around the corner! plus, it’s also a dairy-free dessert and a great option for anyone looking for fruit-based cakes without the dairy drama.
Recipe Overview
Let’s dive in a bit deeper. koogle cake is a beautifully rich yet simple pear cake recipe, cherished for generations in many eastern european families.
It’s like a warm hug in cake form, making it perfect not just for cozy family dinners but also for holiday gatherings.
Worried about the effort? don’t be! this recipe has a medium difficulty level—no baking degree required. you’re looking at about 20 minutes of prep and 45 minutes of baking , giving you about an hour before it’s time to pull this beauty out of the oven.
Trust me, it’s worth every minute!
As far as cost? it’s pretty friendly on the wallet. you probably already have most of the ingredients stashed away in your pantry.
I'm talking flour, sugar, and, let’s not forget those delicious ripe pears! you’ll yield around eight slices of moist goodness, which is perfect for family, friends, or, hey, just you—who am i to judge?
Key Benefits
Now onto the good stuff: the benefits of this koogle pear cake ! not only is it a wonderfully moist and flavorful cake , but it’s also loaded with nutrients.
Pears are a great source of fiber, making this cake a potentially healthier option compared to other light dessert options .
Plus, if you're on the lookout for dairy-free butter alternatives or just want to indulge without the guilt, this cake rocks that boat, too.
You won't miss the dairy one bit. the coconut oil gives a lovely richness while keeping things light, and the subtle sweetness comes from natural sweeteners in baking.
Let's not forget those spiced pear recipes that make every bite a delight!
It’s a showstopper for special occasions, but it's versatile enough to serve at a casual afternoon gather 'round. You know, like when friends drop by unexpectedly? Just whip this up, and they will think you’ve been baking all day!
I remember the first time i made this cake for a potluck. i honestly didn’t think it would impress anyone.
Boy, was i wrong! everyone asked for seconds, even those who usually turn their noses up at gluten-free cake alternatives —and it’s totally vegan, too!
So, are you ready to start your baking adventure? get your ingredients together, and let’s create this bake koogle pear cake - deliciously dairy-free ! you’re gonna love how easy it is, and trust me, your taste buds will thank you.
Now, without further ado, let’s check out what you need.
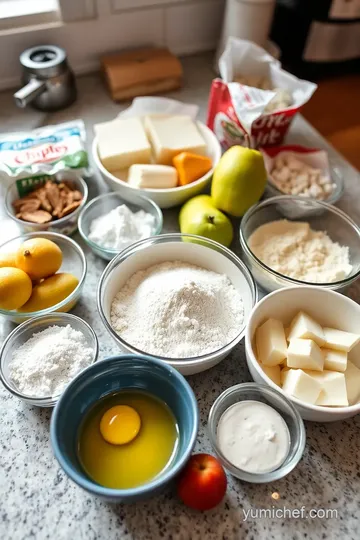
Essential Ingredients Guide
Baking can feel like a magical journey, especially when you’ve got the right essential ingredients on hand. whether you're whipping up something simple or tackling a complex recipe like bake koogle pear cake - deliciously dairy-free , knowing your ingredients makes all the difference.
Let’s dive into the basics!
Premium Core Components
First up, let's talk about your premium core components . it's super important to have high-quality ingredients, not only for flavor but for the right texture in your cake.
Here’s a quick rundown:
- Measurements : For the best results, stick to these measurements:
- 1 ½ cups (190g) of all-purpose flour
- 1 cup (200g) of granulated sugar
- Quality Indicators : Check that your flour is fresh and free from lumps. Sugar should be dry and not clumpy. A fresh cake comes from fresh ingredients!
- Storage Guidelines : Keep your baking ingredients in a cool, dry place. Most spices will last about 6 months , while flour could be good for a whole year.
- Freshness Tips : Smell your ingredients. If they don’t smell like they should, toss 'em. For example, stale baking soda? No thanks!
Signature Seasoning Blend
Now, onto the fun part: signature seasoning blends ! Let’s jazz up your cake with some essentials:
- Essential Spice Combinations : For our cake, it’s all about that comforting cinnamon and pear combination . A simple blend of 1 tbsp ground cinnamon is perfect for that cozy autumn vibe.
- Herb Selections : While we’re not exactly making a soup, a hint of vanilla can dance beautifully with the spices!
- Flavor Enhancers : A splash of pure vanilla extract will elevate your dessert, making it smell heavenly as it bakes.
- Regional Variations : Eastern European desserts often play with spices in interesting ways—consider adding a dash of nutmeg or even cardamom for a twist.
Smart Substitutions
Sometimes, you gotta think on your feet! Here are some smart substitutions if you’re in a pinch:
- Common Alternatives : Don't have almond milk? No worries! Oat milk or even coconut milk can work wonders.
- Dietary Modifications : Are you looking for gluten-free cake alternatives ? Just swap out all-purpose flour for a gluten-free blend!
- Emergency Replacements : Out of eggs? Use 1/4 cup unsweetened applesauce instead—it works like a charm.
- Seasonal Options : Using up leftover fruit? Berries or seasonal stone fruits can also shine in this recipe.
Kitchen Equipment Essentials
Last but not least, you’ll need some must-have kitchen tools to whip up that moist and flavorful cake :
- Mixing bowls: Have a couple of sizes handy!
- Whisk: This is key for getting that batter nice and smooth.
- Rubber spatula: Gentle folding makes a difference when incorporating those juicy pears.
- Cake pan: A 9-inch round cake pan is perfect for this recipe!
If you're missing some tools, no worries! You can always improvise. A mixing bowl can be anything from a measuring cup to a big pot. Get creative!
Wrapping It Up
Before you dive into the instructions for baking your deliciously dairy-free dessert, just remember that baking is about experimentation, just like cooking.
Don’t be afraid to tweak and play with your ingredients! so grab those fresh pears and let’s bring this bake koogle pear cake - deliciously dairy-free to life! cooking should be fun, so let your kitchen adventures begin!

Mastering the Bake: A Guide to Professional Cooking Method
When it comes to cooking professionally, it’s not just about the recipe. it's about the whole experience of creating those delightful dishes we all crave.
If you want to nail a recipe like the bake koogle pear cake - deliciously dairy-free , you've got to get your prep, process, and expert techniques down pat.
Let me walk you through it in a friendly, no-fuss way!
Essential Preparation Steps
First things first, let’s talk about mise en place . this is just a fancy french term for having all your ingredients ready and in place.
Grab your flour, sugar, and those juicy pears, and set them up before you start. it cuts down on chaos later—and we all know cooking can get chaotic!
Time management tips? oh, i’ve got a few. read through the recipe completely before diving in. you’ll want to know how long it takes (like 45 minutes at 350° f ( 175° c) for our pear cake) to avoid any surprises.
A little planning can save you from a last-minute rush!
Next, let’s tidy things up—literally! organize your workspace, and keep an eye on safety. make sure those knives are sharp but not in your way.
Cooking should be fun, not a trip to the er!
Step-by-Step Process
Now onto the good stuff: the process. Here’s the deal:
- Preheat that oven to 350° F ( 175° C) . Don’t skip this step; it’s critical for baking!
- Grab those peeled and diced pears and give them a quick toss with some lemon juice and vanilla. This will keep them fresh and also add flavor.
For the cake, mix your dry ingredients—this includes flour, sugar, and that warm hug of ground cinnamon . in a separate bowl, stir together the wet ingredients: applesauce, melted coconut oil, vanilla, and almond milk .
When combining everything, be gentle! overmixing can turn your cake into a brick. all it takes is a couple of gentle folds to incorporate those pears, and you’re ready to pour this glorious batter into your prepared pan.
Bake it for 40- 45 minutes , then check with a toothpick. If it comes out clean, you’re golden!
Expert Techniques
Okay, let’s get a bit fancy. professional cooks have some secret techniques up their sleeves. one crucial step? temperature control.
If you let the cake cool in the pan for just 10 minutes , then transfer it to a cooling rack, this helps maintain that perfect texture!
As for quality checkpoints, always use fresh ingredients, especially for things like fruit. ripe pears will make your cake moist and flavorful.
A common mistake i see is folks grabbing whatever is left in the fridge—don’t do it!
If your cake doesn’t turn out right, remember: it’s all a learning experience. if it’s too dry, try less mixing next time.
If the flavor seems flat, maybe a touch more cinnamon is in order!
Success Strategies
To really nail that quality assurance , taste your batter before baking (just not too much—you’ve got to save some room!). A little adjustment can go a long way.
And make-ahead options? oh yes! this cake is perfect for prepping the night before. bake it, cool it, and store it in an airtight container.
Just warm it up before serving, and voilà! you’ve got a deliciously dairy-free dessert ready to impress your friends.
Bringing It All Together
So there you have it! with a few tried-and-true professional cooking methods, you’re well on your way to mastering your culinary skills.
Plus, who wouldn’t want a slice of bake koogle pear cake to share around the dining table, right? just thinking about that cinnamon and pear combination is making my mouth water!
Now that you’ve got the scoop on these techniques, it’s time to roll up your sleeves, gather your ingredients, and get baking!
Additional Information
Feeling inspired? there’s always more to learn about baking, whether you’re diving into the world of gluten-free cake alternatives or exploring more fruit-based cakes .
So, swing by for more tips and tricks; your next baking creation awaits!
Pro Tips & Secrets
Let’s kick things off with some pro tips ! you know, the little tricks that turn a good recipe into something extraordinary .
First up, always use ripe pears . trust me, they pack way more flavor. a juicy, tender pear makes all the difference.
And speaking of tricks, here’s one for time-saving: mix your dry ingredients ahead of time. store them in an airtight container.
When you're ready to bake, it’s just a quick whisk and you're good to go!
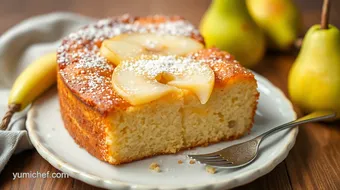
For that flavor boost, consider adding a pinch of nutmeg or another fall spice alongside your cinnamon . oh my gosh, the aroma will fill your kitchen! and can we talk presentation? a sprinkle of powdered sugar or fresh mint on top can transform your bake koogle pear cake - deliciously dairy-free into something that looks like it popped out of a magazine.
Perfect Presentation
Now let’s get sassy with presentation ! plating is an art, even if you’re just serving your family. try using a nice white plate to make that caramel color of your cake pop.
You can stack slices in a fun way or even cut them into triangles for that fancy restaurant vibe . as for garnishes, fresh mint leaves or a drizzle of coconut cream can elevate your cake from “meh” to “wow!”
Consider color combinations too. the light brown of the cake will look gorgeous next to some colorful fruit or nuts on the side.
Take a cue from those foodie instagrams you scroll through—visually appealing plates can make your cake more enticing!
Storage & Make-Ahead
Let’s face it, sometimes life gets busy. if you need to whip up this delicious dairy-free dessert ahead of time, no problem! you can store your cake in an airtight container at room temperature for about 3 days .
If you want to keep it longer, go for the fridge. just remember, the flavors will stay fresher longer if you wrap it tightly—like a warm hug for your cake!
When it comes to reheating, a low oven or microwave works magic. Just be careful not to overdo it. A moist cake is what we’re aiming for, not a dry piece of cardboard!
Creative Variations
Feeling adventurous? let’s dive into some creative variations ! if you have other fruits lying around, why not switch it up? you could easily substitute pears with seasonal apples or even leftover peaches .
How about a spiced pear twist ? add cardamom and a dash of vanilla to jazz things up!
Dietary restrictions? no worries! you can make this recipe gluten-free with a nice flour blend. and those who want a no-sugar option can use natural sweeteners like maple syrup .
It’ll add that lovely caramelized flavor too!
Complete Nutrition Guide
Alright, let’s get a bit serious. we need to talk nutrition. the breakdown for each slice isn’t too shabby! with about 230 calories and just a couple of grams of protein, it’s a manageable treat.
Plus, we’re talking healthy baking here—no dairy, no problem! this cake gives you that moist and flavorful feel without weighing you down.
And the best part? the health benefits of pears—they’re packed with vitamins and fibers! not to mention, the antioxidants do wonders for your body.
So really, indulging in this cake isn’t just about a sweet tooth. it’s nurturing too!
Expert FAQ Solutions
Lastly, let’s tackle some common questions. people often ask, “my cake didn’t rise. what happened?” don't panic; sometimes it’s just the baking soda.
Make sure it’s fresh! or maybe you over-mixed. a good rule of thumb is to stop as soon as everything’s combined.
Feeling like experimenting? try incorporating more spices or other fruits. there’s no set rule! everyone has their personal preferences, so toss in what makes your taste buds dance.
You can create something truly unique every time, like a new take on traditional eastern european desserts !
So there you have it! the journey to baking the bake koogle pear cake - deliciously dairy-free is more than just following a recipe.
It's about embracing family-friendly baking , creating memories, and maybe, just maybe, have a dish that becomes a favorite at your next gathering.
Get ready for all the “wow, this is amazing!” comments. happy baking, y’all! enjoy every delicious bite!
Bake Koogle Pear Cake - Deliciously Dairy-Free Card
⚖️ Ingredients:
- 1 ½ cups all-purpose flour
- 1 cup granulated sugar
- 1 tsp baking soda
- ½ tsp baking powder
- ½ tsp salt
- 1 tbsp ground cinnamon
- ½ cup unsweetened applesauce
- ½ cup coconut oil, melted
- 1 tsp pure vanilla extract
- 1 cup almond milk
- 3 medium ripe pears, peeled, cored, and diced
- 1 tbsp lemon juice
- 1 tbsp brown sugar (optional)
- 1 tsp vanilla extract
🥄 Instructions:
- Step 1: Preheat the oven to 350°F (175°C). Grease and line the cake pan with parchment paper.
- Step 2: In a bowl, toss the diced pears with lemon juice, vanilla extract, and optional brown sugar. Set aside.
- Step 3: In a large bowl, whisk together flour, sugar, baking soda, baking powder, salt, and cinnamon.
- Step 4: In another bowl, combine applesauce, melted coconut oil, vanilla extract, and almond milk. Whisk until combined.
- Step 5: Pour the wet mixture into the dry ingredients and stir with a rubber spatula until just combined. Do not overmix.
- Step 6: Gently fold in the prepared pears until evenly distributed throughout the batter.
- Step 7: Pour the batter into the prepared cake pan and smooth the top. Bake for 40-45 minutes until a toothpick inserted into the center comes out clean.
- Step 8: Allow the cake to cool in the pan for 10 minutes, then transfer it to a cooling rack to cool completely.
- Step 9: Enjoy warm or at room temperature. Garnish with powdered sugar if desired.
Previous Recipe: How to Blend Creamy Tomato Bliss in 40 Minutes: A Comforting Soup
Next Recipe: Best Chill Fresh Cucumber Salad Delight in 20 Min: Amazing Taste Awaits!